These are commonly listed United States Armed Forces terms and tactics. Primarily for use in a variety of situations, there are a lot more but these are the most relevant and necessary to understand.
Generally used on the net and individually, these set pieces are employed in the essence of strategic and tactical concepts and missions. It is imperative that warfighters learn these, especially if choosing a leadership role. Having a brief understanding of each term and concept is key. In many situations, a member must be flexible and identify and utilize these terms. This section provides a brief study on the necessary terminology & tactics. In order for troops to understand these fully, they must be repeated and memorized constantly so that it does not clog up the net and increases your situational awareness.
Generally used on the net and individually, these set pieces are employed in the essence of strategic and tactical concepts and missions. It is imperative that warfighters learn these, especially if choosing a leadership role. Having a brief understanding of each term and concept is key. In many situations, a member must be flexible and identify and utilize these terms. This section provides a brief study on the necessary terminology & tactics. In order for troops to understand these fully, they must be repeated and memorized constantly so that it does not clog up the net and increases your situational awareness.
Dates & Times
References to days (or hours) preceding or following a designated day (or hour) use a plus or minus sign and a numeral following the letter. For example, "D−3" is 3 days prior to D-Day, "C+7" is 7 days after C-day, "H−2" is 2 hours before H-hour, and so forth. In less formal contexts, the time is usually spelled out, so that "D−3" becomes "D minus three" or "D minus 3".
C-Day
Short for "Commencement Day" which usually means when deployment for an operation commences.
Ex: "C-3 until REDCON1"
D-Day
Unnamed day in which an operation begins.
Ex: "D-2 until Operation STONE SENTINEL"
E-Day
The unnamed day on which an exercise commences.
Ex: "Operation Halberd will commence in E-2"
G-Day
The unnamed day on which an order, normally national, is given to deploy a unit.
Ex: "G-1 to commence deployment"
M-Day
The day on which mobilization commences or is due to commence.
Ex: "REDCON3 to commence at M-2"
N-Day
The unnamed day an active duty unit is notified for deployment or redeployment.
Ex: "Redeployment to commence at N-2"
R-Day
The unnamed day on which redeployment of major combat, combat support, and combat service support forces begins in an operation.
Ex: "R-1 until redeployment for all ground forces"
S-Day
The unnamed day the President authorizes Selective Reserve callup (not more than 200,000 men).
Ex: "S+2 from initial callup"
T-Day
The effective day coincident with Presidential declaration of national emergency and authorization of partial mobilization (not more than 1,000,000 personnel exclusive of the 200,000 callup).
Ex: "T-1 from mobilization"
V-Day
Sometimes used to designate "Victory Day", the day an operation successfully concludes.
Ex: "V+3 after successful conclusion of mission"
W-Day
The effective day the President takes the adversary decision to prepare for war (unambiguous strategic warning).
Ex: "Be advised, all forces set to THREATCON 1 in W-3"
F-Hour
The effective time of announcement by the U.S. Secretary of Defense to the Military Departments of a decision to mobilize Reserve units.
Ex: "Effective time of callup in F-1"
H-Hour
Unnamed hour on D-Day in which an operation begins.
Ex: "Operation TIGERSHARK will commence at H-3"
L-Hour
The specific time at which deployment for an operation commences.
Ex: "Deployment for Operation BLACK KNIGHT to commence at L-5"
P-Hour
Unnamed hour on D-Day in which an airborne operation begins.
Ex: "Operation CUTTHROAT will commence at P-1"
Obstacles
1. Protective
To physically protect troops. Protective obstacles are usually located beyond hand-grenade range (40 to 100 meters) from the defensive position. Protective obstacles are a key component of survivability operations. Like final protection fires (FPF), protective obstacles provide the friendly force with close-in protection.
The two types of protective obstacles are--
• Hasty.
• Deliberate.
Hasty Protective Obstacles. These are protective obstacles that are temporary in nature. Troops can rapidly emplace and recover or destroy them. Units employ hasty protective obstacles next to their positions to protect the defending force from the enemy's final assault. Base commanders and base cluster commanders may emplace hasty protective obstacles to protect against all levels of threat in the rear area when sites are to be occupied temporarily.
Deliberate Protective Obstacles. These are protective obstacles that are more permanent and that require more detailed planning and usually more resources. Units employ deliberate protective obstacles in strongpoints or at relatively fixed sites. During operations other than war (OOTW), units emplace deliberate protective obstacles as part of their force protection plan.
Units base the composition of protective obstacles on analysis of the situational template. They design protective obstacles against the most severe and the most likely close combat threat. Emplacing units remove protective obstacles or--turn them over to relieving units--before departing the area. A unit must report if it abandons protective obstacles due to tactical necessity.
2. Tactical
To affect & gain positional advantage to friendly forces. The primary purposes of tactical obstacles are to attack the enemy maneuver and multiply the effects and capabilities of firepower. Tactical obstacles are typically positioned to increase the effectiveness of friendly weapon system. The tactical obstacle is usually positioned on the friendly side of crew-served weapon final protective lines.
Units base tactical obstacle designs (width, depth, and composition) on the intended obstacle effect and formation of the attacker. They develop tactical obstacle designs to achieve one of four obstacle effects--disrupt, turn, fix, or block. Standard designs simplify obstacle resourcing, training, and effectiveness. Typically a commander will issue an Obstacle Intent, which denotes how the commander wants to use tactical obstacles to support his scheme of maneuver. Obstacle intent consists of the following components:
• Target.
• Obstacle effect.
• Relative location.
Tactical obstacles directly attack the enemy's ability to move, mass, and reinforce. Commanders integrate these obstacles into the force's scheme of maneuver and direct- and indirect-fire plans to enhance the effects of friendly fires. The types of tactical obstacles are clearly distinguished by the differences in execution criteria. The three types are--
• Directed obstacles.
• Situational obstacles.
• Reserve obstacles.
Directed Obstacles. The higher commander directs these obstacles as specified tasks to a subordinate unit. Units plan, prepare, and execute directed obstacles during the preparation of the battlefield. Most tactical obstacles are directed obstacles, and most directed obstacles are planned at TF level. Chapter 5 provides details on planning directed obstacles in the context of TF obstacle planning, although the process is the same at any level.
Situational Obstacles. Situational obstacles are obstacles that units plan, and possibly prepare, before beginning an operation; however, they do not execute the obstacles unless specific criteria are met. Therefore, units may or may not execute situational obstacles, depending on the situation that develops during the battle. They are "be prepared" obstacles and provide the commander flexibility for emplacing tactical obstacles based on battlefield development. Chapter 7 provides specific considerations for planning situational obstacles.
Reserve Obstacles. Reserve obstacles are obstacles for which the commander restricts execution authority. These are "on-order" obstacles. The commander usually specifies the unit responsible for emplacing, guarding, and executing the obstacle. Units normally plan and prepare reserve obstacles during preparation of the battlefield. They execute the obstacles only on command of the authorizing commander or based on specific criteria that the commander identifies. Chapter 6 provides specific considerations for planning reserve obstacles.
3. Nuisance
To affect the enemy's scheme of maneuver. Nuisance obstacles are designed and built to restrict movement in areas that cannot be observed and are protected from direct fires. Typically involves forcing opponents into a killzone, creating choke points, deny mobility corridors and avenue of approach to positions
4. Phony
To make the enemy guess where to breach. Phony obstacles give the appearance of actual obstacles but require only minimal resources to emplace. They deceive the enemy by providing the visual signature, or other signatures, of actual tactical or protective obstacles. Phony obstacles are also used to breakup the pattern of tactical wire to prevent the enemy from locating friendly weapons.
Mission Planning
After Action Review (AAR)
Analysis of a unit's performance in order to review strong/weak points, to improve effectiveness. AARs are intended to serve as aids to performance evaluation and improvement, by registering situation–response interactions, analyzing critical procedures, determining their effectiveness and efficiency, and proposing adjustments and recommendations.
AARs have three central objectives:
• Identifying problematic issues and needs for improvement
• Proposing measures to counteract problematic elements
• Obtaining “lessons learned”
Structure of an AAR
• Overview
• Goals and objectives
• Analysis of outcomes
• Analysis of the performance shown on critical tasks
• Summary
• Recommendations
Course of Action (COA)
A plan; a set of intended actions, through which one intends to achieve a goal or otherwise a procedure adopted to deal with a situation.
Usually 3 COAs are reviewed for which one is the best
Usually 3 COAs are reviewed for which one is the best
METT-TC
Mission, Enemy, Terrain/Weather, Troops/Support Available, Time and Civilian considerations
Mission, Enemy, Terrain/Weather, Troops/Support Available, Time and Civilian considerations
METT-TC is a form of aid used in Operational Orders and are the relevant factors in operational planning. Another way to phrase that, is that your plan of action is always METT-TC dependent. For instance, you may be developing a plan to assault an airfield. But if the weather changes, this may change your plan. Or suppose you had 36 hours to assault this airfield, but due to supply considerations, that timetable has to accelerate to 12 hours. Your plan is METT-TC dependent -- changes to these factors will change your plan. During the conduct of the military decision, many factors determine how METT-TC affects the security and operation of sustainment assets and include these adjustments to the SOP for specific operations allocating additional rehearsal time for the adjustment.
OCOKA (used in the Terrain/Weather portion of the METT-TC)
Observation & Fields of Fire, Cover & Concealment, Obstacles, Key or Decisive Terrain and Avenues of Approach.
Observation & Fields of Fire, Cover & Concealment, Obstacles, Key or Decisive Terrain and Avenues of Approach.
Operational Order (OPORD)
5 paragraph mission planning format.
5 paragraph mission planning format.
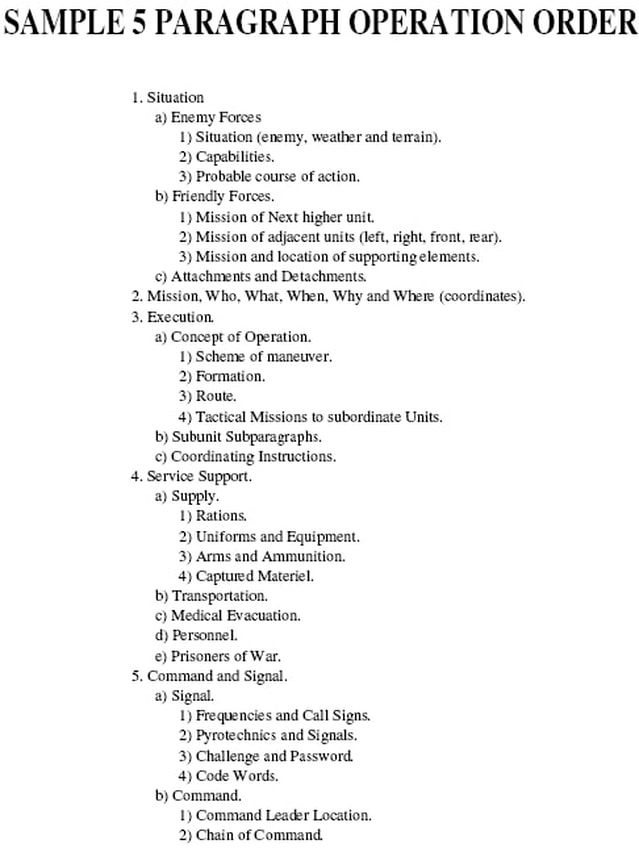
1. SITUATION.
(Enemy/Friendly forces)
• a. Area of Interest.
• b. Area of Operations.
(1) Terrain.
(2) Weather.
• c. Enemy Forces.
(1) Composition, Disposition, and Strength.
(2) Recent Activities.
(3) Locations and Capabilities.
(4) Enemy COAs (Courses of Action).
• d. Friendly Forces.
(1) Higher HQ Mission and Intent.
(2) Mission of Adjacent Units.
• e. Attachments and Detachments.
2. MISSION.
A concise statement that includes the Who, What, Where, When, and Why of the operation to be conducted.
3. EXECUTION.
(Concept of Operation)
• c. Commander's Intent
• b. Concept of operations.
(1) Maneuver.
(2) Fires.
(3) Reconnaissance and Surveillance.
(4) Intelligence.
(5) Engineer.
(6) Air Defense.
(7) Information Operations.
• c. Scheme of Movement and Maneuver.
• d. Scheme of Fires.
• e. Casualty Evacuation.
• f. Tasks to Subordinate Units
• g. Tasks to Combat Support.
(1) Intelligence.
(2) Engineer.
(3) Fire Support.
(4) Air Defense.
(5) Signal.
(6) CBRNE (Chemical, Biological, Radiological, Nuclear, and Explosive weapons)
(7) Provost Marshal.
(8) MISO (Military Information Support Operations, formerly Psychological Operations or PSYOP)
(9) Civil Military.
• h. Coordinating Instructions.
(1) Time or condition when the plan or order becomes effective.
(2) CCIR (Commander's Critical Information Requirements)
(3) EEFI (Essential Elements of Friendly Information)
(4) Risk Reduction Control Measures.
(5) Rules of Engagement.
(6) Environmental Considerations.
(7) Force Protection.
4. SUSTAINMENT.
• a. Logistics.
(1) Sustainment Overlay.
(2) Maintenance.
(3) Transportation.
(4) Supply.
(5) Field Services.
• b. Personnel Services Support.
(1) Method of marking and handling EPWs.
(2) Religious Services.
• c. Health System Support.
(1) Medical Command and Control.
(2) Medical Treatment.
(3) Medical Evacuation.
(4) Preventive Medicine.
5. COMMAND AND CONTROL.
• a. Command.
(1) Location of Commander.
(2) Succession of Command.
• b. Control.
(1) Command Posts.
(2) Reports.
c. Signal.
(1) Signal Operating Instructions index in effect.
(2) Methods of communication by priority.
(3) Pyrotechnics and Signals.
(4) Code Words.
(5) Challenge and Password.
(6) Number Combination.
(7) Running Password.
(8) Recognition Signals.
Warning Order (WARNO)
Initial alert to an upcoming mission. Informs units that an OPORD may be forthcoming. Time and circumstances permitting, a WARNORD is issued to subordinate leaders immediately after receipt of the unit's mission from higher. This is intended to provide subordinates time to develop their own warning and operations orders based on information contained within the WARNORD.
(1) Situation
a) Enemy Forces – This section is extremely important and should be given in as much detail as time allows. Give the enemy’s disposition, strength, composition, capabilities and most likely course of action (MLCOA). This will allow your troops to properly equip themselves with any additional weaponry or equipment necessary.
b) Friendly Forces – Use this section to briefly describe any friendly forces that may be operating in the AO or with your unit during the operations. Also, give the mission of the next higher unit and any adjacent units. This is always important to help reduce fratricide. Be sure to give any information that may help in identifying adjacent friendly forces while in the field.
c) Attachments and Detachments – Give any information pertaining to attached units such as EOD, K-9, Combat Lifesavers etc.
(2) Mission
This is given in the Who, What, When, Where, Why (5W’s) format and it should be clear to everyone as to what the objective is and how you plan to reach your desired end state. Always repeat the mission twice.
(3) Execution
Provide as much information about how the actual mission will take place as possible. During a WARNO this can be brief or detailed but should give everyone involved a good idea as to how you are going to accomplish the mission. Remember to give any information that may help them prepare appropriately. An example would be to tell them you will be conducting INFIL via rotary wing aircraft and that everyone needs to bring rappel gloves.
(4) Command and Signal
This is essentially the beans and bullets portion. This gives troops an idea as to how they will get the equipment needed to complete the operation.
(5) Service and support
This gives the command structure during the operation, freqs, call signs and any other pertinent information. Again when giving the WARNO be sure to give troops the information they need to prepare for the mission. For example, if you are planning to do satellite communication during your operation you need to tell your radio personnel to bring the appropriate radio, antennas, and fills.
Fragmentary Order (FRAGO)
A change to the OPORD. Informs units that one or more elements of the base order have changed. Once an OPORD is given, the situation may change before the mission begins, or, during the operation the situation may change so that the base order must be modified. In these cases the commander will issue a FRAGORD. The FRAGORD follows the same format as the base order but only states the changes that must be made.
A FRAGO may also be formatted in a line system and relayed via radio. The intention is to initiate timely changes of existing orders to subordinate and supporting commanders while providing notification to higher and adjacent commands. Send FLASH precedence operations & intelligence or command in accordance with unit SOPs.
LINE 1 — DATE AND TIME______________________________(DTG)
LINE 2 — UNIT________________________________________(Unit Making Report)
LINE 3 — FRAGO ORDER NO.___________________________(Fragmentary Order)
LINE 4 — REFERENCES_________________________________(Changes to OPORD Only)
LINE 5 — TIME ZONE___________________________________(Time Zone Used in FRAGO)
LINE 6 — SITUATION___________________________________(Mandatory Include Changes)
LINE 7 — MISSION_____________________________________(Mandatory)
LINE 8 — EXECUTION — INTENT_________________________(Optional)
a. CONCEPT OF OPERATIONS ____________________(Changes to OPORD Only)
b. TASKS TO SUB UNITS_________________________(Changes to OPORD Only)
c. COORDINATING INSTRUCTIONS._______________(Changes to OPORD Only)
LINE 9 — SERVICE SUPPORT ____________________________(With Changes)
LINE 10 — COMMAND AND SIGNAL______________________(With Changes)
LINE 11 — ACKNOWLEDGE______________________________(Mandatory)
LINE 12 — CDR NAME, RANK____________________________(Commander’s Name and Rank)
LINE 13 — OFFICIAL____________________________________(Optional)
LINE 14 — ANNEXES____________________________________(Optional)
LINE 15 — DISTRIBUTION_______________________________(Optional)
LINE 16 — NARRATIVE_________________________________(Free Text for Additional Information Required for Clarification of Report)
LINE 17 — AUTHENTICATION___________________________(Report Authentication)
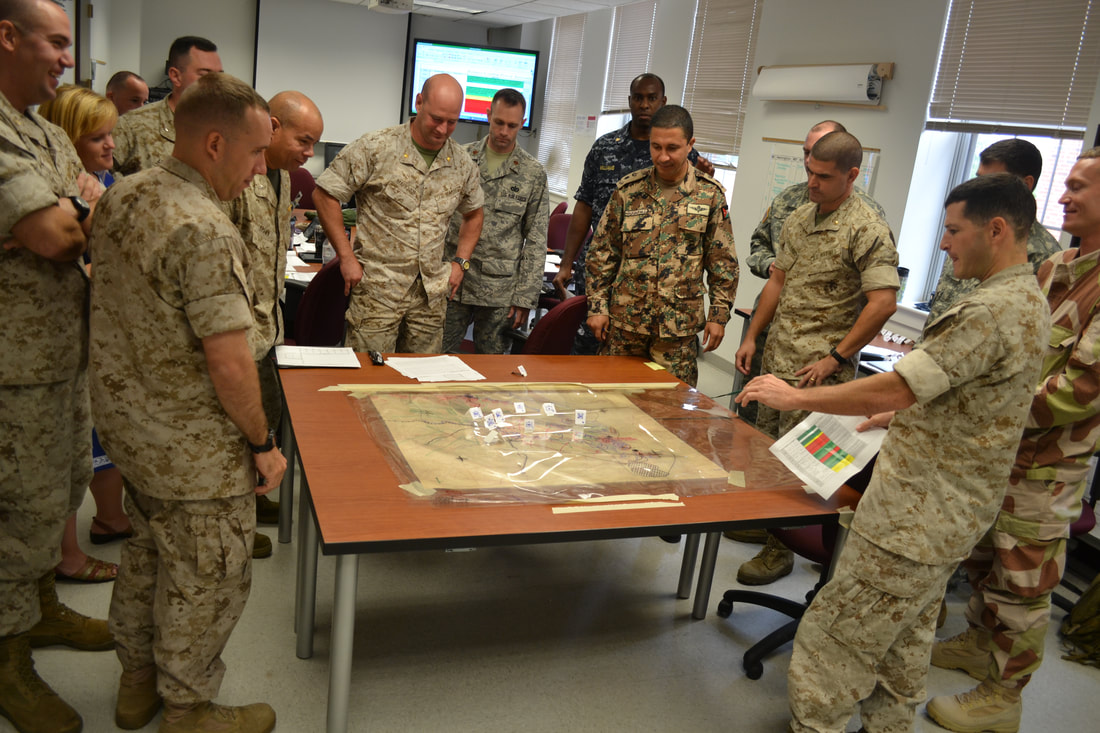
U.S. Army's Eight Troop Leading Procedures (TLP)
Troop Leading Procedures are a sequence of actions that enable the unit leader to use available time effectively and efficiently in the planning, preparing, executing, and assessing of combat missions.
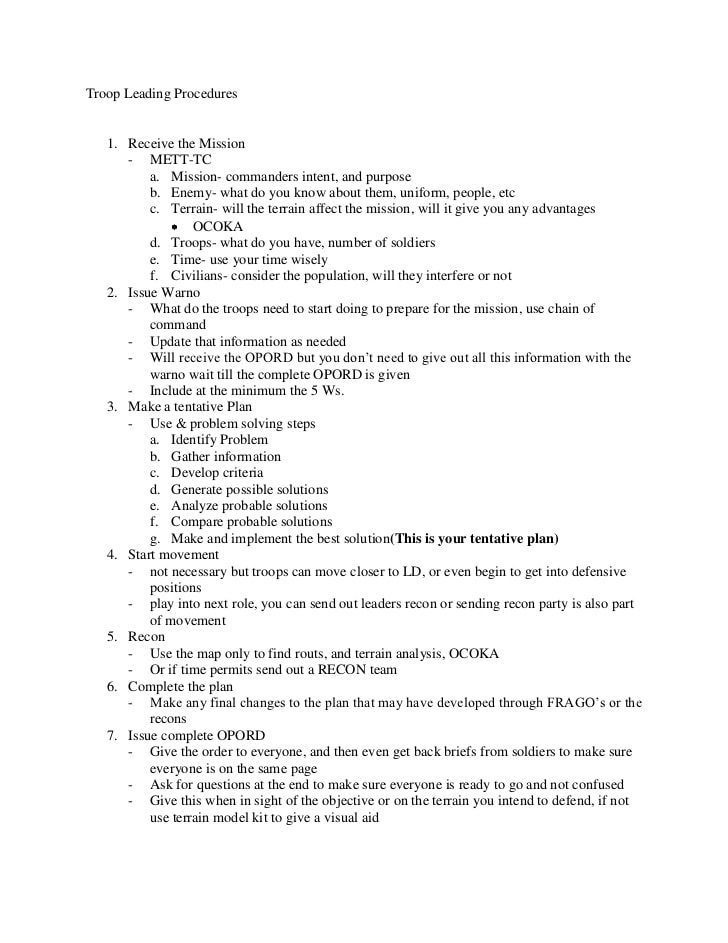
1. Receive the Mission
The leader may receive the mission in a warning order, an operation order (OPORD), or a fragmentary order (FRAGO). He immediately begins to analyze it using the factors of METT-T:
• What is the MISSION?
• What is known about the ENEMY?
• How will TERRAIN and weather affect the operation?
• What TROOPS are available?
• How much TIME is available?
(1) The leader should use no more than one third of the available time for his own planning and for issuing his operation order. The remaining two thirds is for subordinates to plan and prepare for the operation. Leaders should also consider other factors such as available daylight and travel time to and from orders and rehearsals. In the offense, the leader has one third of the time from his receipt of the mission to the unit’s limited time. In the defense, he has one third of the time from mission receipt to the time the unit must be prepared to defend.
(2) In scheduling preparation activities, the leader should work backwards from the LD or defend time. This is reverse planning. He must allow enough time for the completion of each task.
2. Issue a Warning Order
The leader provides initial instructions in a warning order. The warning order contains enough information to begin preparation as soon as possible. SOPs should prescribe who will attend all warning orders and the actions they must take upon receipt: for example, drawing ammunition, rations and water, and checking communications equipment.
The warning order has no specific format. One technique is to use the five-paragraph OPORD format. The leader issues the warning order with all the information he has available at the time. He provides updates as often as necessary. The leader never waits for information to fill a format.
If available, the following information may be included in a warning order.
• The mission or nature of the operation.
• Who is participating in the operation.
• Time of the operation.
• Time and place for issuance of the operation order.
3. Make a tentative plan
The leader develops an estimate of the situation to use as the basis for his tentative plan. The estimate is the military decision making process. It consists of five steps:
1. Detailed mission analysis
2. Situation analysis and course of action development
3. Analysis of each course of action
4. Comparison of each course of action
5. Decision.
The decision represents the tentative plan. The leader updates the estimate continuously and refines his plan accordingly. He uses this plan as the start point for coordination, reconnaissance, task organization (if required), and movement instructions. He works through this problem solving sequence in as much detail as time available allows. As the basis of his estimate, the leader considers the factors of METT-T.
4. Initiate movement
The unit may need to begin movement while the leader is still planning or forward reconnoitering. A senior non-commissioned officer, squad leader or team leader may bring the unit forward, usually under the control of the second in command or senior non-commissioned officer of the unit .
This is where your subordinate leaders prepare men, weapons and equipment for the coming mission. It is an excellent time for them to eat, conduct maintenance on weapons/equipment, and gather together anything they are going to need for the upcoming mission.
This step could occur at any time during the troop-leading procedure.
5. Conduct reconnaissance
If time allows, the leader performs necessary reconnaissance to verify his terrain analysis, suspected enemy forces, adjust his plan, confirm the usability of routes, and time any critical movements. When time does not allow, the leader must make a map reconnaissance. If no other means are available, the leader will perform the reconnoiter by himself and must consider the risk inherent in conducting reconnaissance forward of friendly lines. Typically it is best that the leader relies on his subordinates, such as forward scouts to conduct the reconnaissance if the risk of contact with the enemy is high.
6. Complete the plan
The leader completes his plan based on the reconnaissance and any changes in the situation. He should review his mission, as he received it from his commander, to ensure that his plan meets the requirements of the mission and stays within the framework of the commander’s intent.
7. Issue the operations order
Leaders normally issue oral operations orders.
(1) To aid subordinates in understanding the concept for the mission, leaders should issue the order within sight of the objective or on the defensive terrain. When this is not possible, they should use a terrain model or sketch.
(2) Leaders must ensure that subordinates understand the mission, the commander’s intent, the concept of the operation, and their assigned tasks. Leaders may require subordinates to repeat all of part of the order or demonstrate on the model or sketch, their understanding of the operation. They should also quiz their troops to ensure that they understand the mission.
8. Supervise and refine
The leader supervises the unit’s preparation for combat by conducting rehearsals and inspections.
(1) Rehearsals. The leader uses rehearsals to–
• Practice essential tasks (improve performance).
• Reveal weaknesses or problems in the plan.
• Coordinate the actions of subordinate elements.
• Improve subordinate understanding of the concept of the operation (foster confidence in troops).
(a) Rehearsals include the practice of having squad leaders brief their planned actions in execution sequence to the unit leader.
(b) The leader should conduct rehearsals on terrain that resembles the actual ground, and in similar light conditions.
(c) The unit may begin rehearsals of battle drills and other SOP items before the receipt of the operation order. Once the order has been issued, it can rehearse mission specific tasks.
(d) Some important tasks to rehearse include–
• Actions on the objective.
• Assaulting a trench, bunker, or building.
• Actions at the assault position.
• Breaching obstacles (mine and wire).
• Using special weapons or demolitions.
• Actions on unexpected enemy contact.
• Additional mission profiles and action plans
(2) Inspections. Squad leaders should conduct initial inspections shortly after receipt of the warning order. The senior non-commissioned officer spot checks throughout the unit’s preparation for combat. The senior leaders make a final inspection. They should inspect–
• Weapons and ammunition.
• Uniforms and equipment.
• Mission-essential equipment.
• Troop’s understanding of the mission and their specific responsibilities.
• Communications.
• Rations and water.
• Camouflage.
• Deficiencies noted during earlier inspections.
United States Marine Corps' BAMCIS
BAMCIS is an acronym used by the United States Marine Corps to help strategic planners make plans that save the lives of Marines and accomplish mission objectives. It is commonly known as the 6 troop leading steps.
How the Marines use BAMCIS is rather straight forward. The goal is to gather information, make a plan, execute and ensure the success of the mission. It is one of the core tenets in Marine Corps leadership and explains much of how they think and problem solve.
The first steps involve become aware enough of a situation to start to devise theoretical ways to solve it. Then you have to be able to gather information that will help you make your decision. This requires a plan itself. Once you have enough information you can complete your planning and from then it is a matter of executing and ensuring that everything went according to your vision.
1. Begin the Planning
A leader should begin planning as soon as he is assigned a mission to accomplish.
2. Arrange Recon
Reconnaissance is an investigation of a route or a specific area. This can either be done physically on the ground to be investigated or visually from a map.
3. Make Recon
The next step is to perform the reconnaissance. In some cases the leader may be unable to make a physical reconnaissance because of time constraints or to ensure surprise.
4. Complete Planning
After completing the reconnaissance, the leader reviews the preliminary plan and decides on a course of action. The plan should be simple and should not endanger troops or equipment any more than what is necessary to accomplish the mission.
5. Issue Order
Organize and issue the operations order. Before issuing the order, the leader should orient subordinates from a vantage point. If this is not possible, they should be oriented using maps, sketches, aerial photos or terrain models.
6. Supervise
Supervise is the most important troop leading step. During this step the leader ensures the order is carried out as intended.
For both BAMCIS and the Eight Troop Leading Procedures, Supervision is the most important step. It provides a structure for the unit to be able to understand and execute the mission of the unit leader. It is different from other instruction from higher authority in that it is given orally, instead of being issued as written orders. Officers and non-commissioned officers also use it informally to communicate relevant information prior to a non-combat movement (e.g. administrative travel/convoy, field exercise movements, weapon re-qualification, liberty, etc.).
Planning Staff
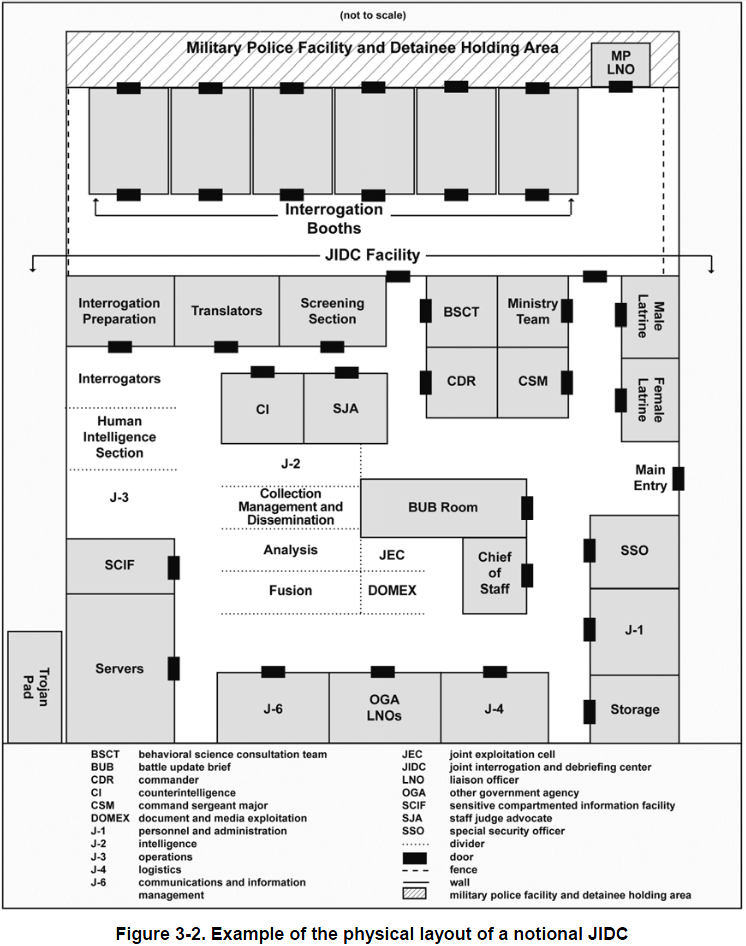
Planning Staff are composed of a group of officers, enlisted and civilian personnel that are responsible for the administrative, operational and logistical needs of its unit. It provides bi-directional flow of information between a commanding officer and subordinate military units. A staff also provides an executive function where it filters information needed by the commander or shunts unnecessary information. Units commanded by a general officer have a chief of staff and a general staff in which the staff sections are designated as G-1, G-2, etc. Battalions and larger units replace the company (and battery) first sergeant with a sergeant major, as the senior enlisted advisor to the unit commander.
S-1 — Manpower / Administration / Finance / Personnel
The manpower or personnel officer supervises personnel and administration systems. This department functions as the essential administrative liaison between the subordinate units and the headquarters, handling personnel actions coming from the bottom up (such as a request for an award to be given to a particular servicemember) or from the top down (such as orders being received from the army level directing that a particular servicemember be reassigned to a new unit outside the command). In the United States Army & Marine Corps, this person is often called the Adjutant. The S1 also works with the postal mailing office and deals with awards and ranks. S-1 may also set the finance policy for the operation. Operationally, the Administration and Finance may be interlinked, but have separate reporting chains.
S-2 — Intelligence, Security and Information
The intelligence section is responsible for collecting and analyzing intelligence information about the enemy to determine what the enemy is doing, or might do, to prevent the accomplishment of the enemy's mission. This office may also control maps and geographical information systems and data. At the unit level, the S2 is the unit's security officer, and the S2 section manages all security clearance issues for the unit's personnel. Other duties of the S2 often include intelligence oversight and physical security.
S-3 — Operations & Training
The operations office includes plans and training. The operations office plans and coordinates operations, and all things necessary to enable the formation to operate and accomplish its mission. In most units, the operations office is the largest of the staff sections and considered the most important. All aspects of sustaining the unit's operations, planning future operations, and additionally planning and executing all unit training, fall under the responsibility of operations. The operations office is also tasked with keeping track of the weekly training schedules and organizes as well as coordinates training activity conducted by a Headquarters and also supervise and support subordinate units. In most military units (i.e., battalion, regiment, and brigade), the operations officer carries the same rank as the executive officer (XO), but ranks third in the unit's chain of command while the other staff officers are one rank lower. For example, in a battalion, the S3 would hold the rank of major (like the battalion XO), while the remaining staff officers are captains or lieutenants.
S-4 — Logistics
The logistics office is responsible for managing the wide scope of material, transport, facilities, services and medical/health support:
• Design, development, acquisition, storage, distribution, maintenance, evacuation, and disposition of materiel.
• Transport of personnel and material.
• Acquisition or construction, maintenance, operation, and disposition of facilities.
• Acquisition or furnishing of services.
• Medical and health service support.
By NATO doctrine, the logistic staff is tasked with overseeing logistic aspects and principles, where the focus is that logistic support must be focused towards ensuring the success of the operation and prescriptions of elements such as responsibility and authority. A logistic staff may be divided into sections based on branch or geographic area. Each section may in turn also be divided into tasks and roles. The size of the logistic staff can vary greatly, depending on the environment and complexity of operations. NATO in example works with a Multinational Joint Logistic Center, which exists outside of the force commander's staff, but runs as a separate entity/unit, with only a few logistic personnel in the commander's staff who act as liaisons.
S-5 — Civil Military Cooperation / Civil Affairs / Plans & Strategy
Civil-Military Co-operation or civil affairs are the activities that establish, maintain, influence, or exploit relations between the military forces, the government or non-government civilian organizations and authorities, and the civilian populace in a friendly, neutral, or hostile area of operations in order to facilitate military operations and consolidate and achieve mission objectives. The plans and strategy office is responsible for civil military operations (CMO) strategy planning. At the unit level, the S5 is the primary adviser to the commander on the civilian-to-military and military-to-civilian impact of the mission/operation within the host nation's (HN) area of interest (AOI), area of operations (AO), or the target area of interest (TAOI). The G5 serves as the mission support office (MSO) at the division level and HHC for civil military plans and strategy.
S-6 — Signals & Communications
The signal office directs all communications and is the point of contact for the issue of communications instructions and protocol during operations as well as for communications troubleshooting, issue, and preventative maintenance. Communications at this level is paired with digital as well as voice (radio, computer, etc.). At the unit level, S6 is also usually responsible for all electronic systems within a unit to include computers, faxes, copy machines, and phone systems.
DefensIVE OPERATIONS
The purpose of defensive operations is to cause an enemy attack to fail and create conditions favorable for assuming the offensive.
Reasons to conduct defensive operations
• To defeat an enemy attack
• To gain time to prepare for other operations
• To allow a higher commander to concentrate forces elsewhere
• To control key enemy forces as a prelude to offensive operations
• To retain key or decisive terrain
• To defeat an enemy attack
• To gain time to prepare for other operations
• To allow a higher commander to concentrate forces elsewhere
• To control key enemy forces as a prelude to offensive operations
• To retain key or decisive terrain
5 characteristics of the Defense
1. Massing Effects
Defenders seek to mass the effects of overwhelming combat power where they choose and shift it to support the decisive operation, or Main Effort (ME).
2. Flexibility
The defender must be agile enough to avoid the attackers blows and then strike back effectively.
• Derived from sound preparation and effective C2.
• Ability to shift the Main Effort (ME).
• Aggressive Recon and Surveillance (R&S).
• Retention of a reserve.
• Preparation in depth such as alternate and supplementary positions.
3. Preparation
Defenders must Arrive in the battle area before the attacker and take advantage of their resources and terrain to prepare for the oncoming assault.
• Use METT-TC to identify potential friendly and enemy weaknesses.
• Synchronize the concept of the operation with all available resources
• Ensure 360 degree security with weapon systems
• Begin R&S plan immediately
4. Security
Never permit the enemy to acquire an unexpected
advantage.
Security operations help deceive the enemy as to friendly locations, strengths, and weaknesses.
5. Disruption
Defenders use spoiling attacks before enemies can focus combat power, and counterattacks before they can consolidate any gains.
• Disrupt the attacker's tempo and synchronization by countering his initiative and preventing him from massing overwhelming combat power.
• Interrupt the attacker's fire support, logistical support, and Command and Control (C2).
(These five characteristics are generally remembered through the saying; Many Fat People Should Diet)
Infantry Defensive Operations
Area Defense
Deny enemy forces access to designated terrain for a specific time rather than destroying the enemy outright.
An area defense should be conducted when:
• Directed to defend or retain specified terrain.
• A commander cannot resource a striking force.
• The forces available have less mobility than the enemy.
• The terrain affords natural lines of resistance and limits the enemy to a few well-defined avenues of approach, thereby restricting the enemy's maneuver.
• There is enough time to organize the position.
• Terrain constraints and lack of friendly air superiority limit the striking force's options in a mobile defense to a few probable employment options.
Conditions require the preservation of forces when transitioning from offensive focus to stability or defensive tasks are superfluous to mission
Mobile Defense
Destroy or defeat the enemy through a decisive attack by a striking force. The striking force is a dedicated counter-attack force in a mobile defense constituted with the bulk of available combat power. A fixing force supplements the striking force.
• Orients on destruction / defeat of enemy forces vs. terrain.
• Defenders must have equal or greater mobility than attackers.
• Frontage exceeds defender's capability
• Depth of AO conducive to drawing in of enemy force
• Time for preparing defensive positions is limited
• Sufficient armored/aviation/fires for rapid concentration of combat power
• AO lacks well-defined avenues of approach
Retrograde
Organized movement away from the enemy. There are three forms: delay, withdrawal, and retirement.
There are major differences in retrograde operations.
Delay: A form of retrograde operation in which a force under pressure trades space for time by slowing down the enemy's momentum and inflicting maximum damage on the enemy without, in principle, becoming decisively engaged.
Withdrawal: A form of retrograde measure in which a force in contact disengages from an enemy force. The commander may or may not conduct a withdrawal under enemy pressure.
Retirement: A form of retrograde operation in which a force out of contact with the enemy moves away from the enemy. A retiring unit organizes for combat but does not anticipate interference by enemy ground forces.
• Disengage from operations (withdrawal, delay, or retirement).
• Reposition forces to more favorable position.
• Reposition forces elsewhere to be used in other missions.
• Gain time without fighting a decisive engagement.
• Resist, exhaust, and damage enemy in situations that do not favor a defense.
• Draw enemy into an unfavorable situation that causes his lines of communications (LOCs) to be extended.
• Preserve forces or avoid combat that no longer promises success.
• Simplify own logistic sustainment by shortening LOCs.
• Position forces in order to safely conduct reconstitution.
• Adjust the defensive scheme, such as secure more favorable terrain.
• Deceive the enemy.
Infantry Small Unit Defensive Missions
Defend a:
• Zone/Area
• Battle Position
• Strongpoint
• Perimeter
• Reverse Slope
• Zone/Area
• Battle Position
• Strongpoint
• Perimeter
• Reverse Slope
Defend an Area

Defending an area sector allows a unit to maintain flank contact and security while ensuring unity of effort in the scheme of maneuver. Areas afford depth in the defense. They allow the unit to achieve the unit leader’s desired end state while facilitating clearance of fires at the appropriate level of responsibility. The company commander normally orders a unit to defend an area when flexibility is desired, when retention of specific terrain features is not necessary, or when the unit cannot concentrate fires because of any of the following factors:
• Extended frontages.
• Intervening, or cross-compartmented, terrain features.
• Multiple avenues of approach.
The unit is assigned an area defense mission to prevent a specific amount of enemy forces from penetrating the area of operations. To maintain the integrity of the area defense, the unit must remain tied to adjacent units on the flanks. The unit may be directed to conduct the defense in one of two ways.
He may specify a series of subsequent defensive positions within the area from where the unit will defend to ensure that the fires of two units can be massed.
He may assign an area to the unit. The unit leader assumes responsibility for most tactical decisions and controlling maneuvers of his subordinate units by assigning them a series of subsequent defensive positions. This is done in accordance with guidance from the company commander in the form of intent, specified tasks, and the concept of the operation. The company commander normally assigns an area to a unit only when it is fighting in isolation.
Defend a Battle Position

The company commander assigns the defensive technique of defending a battle position to his units when he wants to mass the fires of two or more units in a company engagement area, or to position a unit to execute a counterattack. A unit defends from a battle position to--
• Destroy an enemy force in the engagement area.
• Block an enemy avenue of approach.
• Control key or decisive terrain.
• Fix the enemy force to allow another friendly unit to maneuver.
The company commander designates engagement areas to allow each unit to concentrate its fires or to place it in an advantageous position for the counterattack. Battle positions are developed in such a manner to provide the unit the ability to place direct fire throughout the engagement area. The size of the unit battle position can vary, but it should provide enough depth and maneuver space for subordinate squads to maneuver into alternate or supplementary positions and to counterattack. The battle position is a general position on the ground. The unit leader places his squads on the most favorable terrain in the battle position based on the higher unit mission and commander’s intent. The unit then fights to retain the position unless ordered by the company commander to counterattack or displace. The following are basic methods of employing a unit in a battle position:
• Same battle position, same avenue of approach.
• Same battle position, multiple avenues of approach.
• Different battle positions, same avenue of approach.
• Different battle positions, multiple avenues of approach.
Squads are on the same battle position covering the same avenue of approach. The unit can defend against mounted and dismounted attacks and move rapidly to another position.
All squads are in the same battle position when the terrain provides good observation, fields of fire, and cover and concealment.
Employing all the subordinate units of the unit on the same battle position covering the same avenue of approach is the most conservative use of the unit. Its primary advantages are that it facilitates command and control functions because of the proximity of squad elements on the same approach and it provides increased security.
Defend a Strongpoint

Defending a strongpoint is not a common mission for a unit. A strongpoint defense requires extensive engineer support (expertise, materials, and equipment), and takes a long time to complete. When the unit is directed to defend a strongpoint, it must retain the position until ordered to withdraw. The success of the strong-point defense depends on how well the position is tied into the existing terrain. This defense is most effective when it is employed in terrain that provides cover and concealment to both the strongpoint and its supporting obstacles. Mountainous, forested, or urban terrain can be adapted easily to a strongpoint defense. Strongpoints placed in more open terrain require the use of reverse slopes or of extensive camouflage and deception efforts. This defensive mission may require the unit to--
• Hold key or decisive terrain critical to the company or battalion scheme of maneuver.
• Provide a pivot to maneuver friendly forces.
• Block an avenue of approach.
• Canalize the enemy into one or more engagement areas.
Characteristics of the Strongpoint Defense
The prime characteristic of an effective strongpoint is that it cannot be easily overrun or bypassed. It must be positioned and constructed so the enemy knows he can reduce it only at the risk of heavy casualties and significant loss of materiel. He must be forced to employ massive artillery concentrations and dismounted Infantry assaults in his attack, so the strongpoint must be tied in with existing obstacles and positioned to afford 360-degree security in observation and fighting positions.
Techniques and Considerations
A variety of techniques and considerations are involved in establishing and executing the strongpoint defense, including considerations for displacement and withdrawal from the strongpoint.
The unit leader begins by determining the projected size of the strongpoint. He does this through assessing the number of weapons systems and individual troops available to conduct the assigned mission, and by assessing the terrain on which the unit will fight. He must remember that although a strongpoint is usually tied into a company defense and flanked by other defensive positions, it must afford 360-degree observation and firing capability.
The unit leader must ensure that the layout and organization of the strongpoint maximizes the capabilities of the unit’s personnel strength and weapons systems without sacrificing the security of the position. Unit options range from positioning anti-tank weapon systems outside the strongpoint (with squads occupying fighting positions inside it), to placing all assets within the position. From the standpoint of planning and terrain management, placing everything in the strongpoint is the most difficult option and potentially the most dangerous because of the danger of enemy encirclement.
In laying out the strongpoint, the unit leader designates weapon positions that support the company defensive plan. Once these primary positions have been identified, he continues around the strongpoint, siting weapons on other possible enemy avenues of approach and engagement areas until he has the ability to orient effectively in any direction. The fighting positions facing the company engagement area may be along one line of defense or staggered in depth along multiple lines of defense (if the terrain supports positions in depth).
The unit’s reserve may be comprised of a fire team, squad, or combination of the two. The unit leader must know how to influence the strongpoint battle by employing his reserve. He has several employment options including reinforcing a portion of the defensive line or counterattacking along a portion of the perimeter against an identified enemy main effort.
The unit leader should identify routes or axes that will allow the reserve to move to any area of the strongpoint. He should then designate positions the reserve can occupy once they arrive. These routes and positions should afford sufficient cover to allow the reserve to reach its destination without enemy interdiction. The unit leader should give special consideration to developing a direct fire plan for each contingency involving the reserve. The key area of focus may be a plan for isolating an enemy penetration of the perimeter. Rehearsals cover actions the unit takes if it has to fall back to a second defensive perimeter, including direct fire control measures necessary to accomplish the maneuver. FPF may be employed to assist in the displacement.
Engineers support strongpoint defense by reinforcing the existing obstacles. Priorities of work will vary depending on the factors of METT-TC, especially the enemy situation and time available. For example, the first 12 hours of the strongpoint construction effort may be critical for emplacing countermobility obstacles and survivability positions, and command and control bunkers. If the focus of engineer support is to make the terrain approaching the strongpoint impassable, the battalion engineer effort must be adjusted accordingly.
The battalion obstacle plan provides the foundation for the company strongpoint obstacle plan. The commander or unit leader determines how he can integrate protective obstacles (designed to defeat dismounted enemy Infantry assaults) into the overall countermobility plan. If adequate time and resources are available, he should plan to reinforce existing obstacles using field-expedient demolitions.
Once the enemy has identified the strongpoint, he will mass all the fires he can spare against the position. To safeguard his squads, the unit leader must arrange for construction of overhead cover for individual fighting positions. If the strongpoint is in a more open position (such as on a reverse slope), he may also plan for interconnecting trenchlines. This will allow troops to move between positions without exposure to direct and indirect fires. If time permits, these crawl trenches can be improved to fighting trenches or standard trenches.
Defend a Perimeter
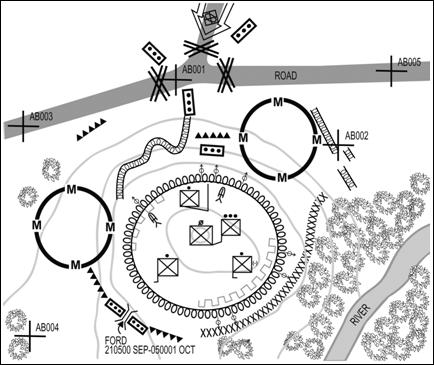
A perimeter defense allows the defending force to orient in all directions. In terms of weapons emplacement, direct and indirect fire integration, and reserve employment, a unit leader conducting a perimeter defense should consider the same factors as for a strongpoint operation.
The perimeter defense allows only limited maneuver and limited depth. Therefore, the unit may be called on to execute a perimeter defense under the following conditions:
• Holding critical terrain in areas where the defense is not tied in with adjacent units.
• Defending in place when it has been bypassed and isolated by the enemy.
• Conducting occupation of an independent assembly area or reserve position.
• Preparing a strongpoint.
• Concentrating fires in two or more adjacent avenues of approach.
• Defending fire support or engineer assets.
• Occupying a patrol base.
The major advantage of the perimeter defense is the unit’s ability to defend against an enemy avenue of approach. A perimeter defense differs from other defenses in that--
• The trace of the unit is circular or triangular rather than linear.
• Unoccupied areas between squads are smaller.
• Flanks of squads are bent back to conform to the plan.
• The bulk of combat power is on the perimeter.
• The reserve is centrally located.
NOTE: A variant of the perimeter defense is the use of the shaped defense, which allows two of the unit’s subordinate elements (squads) to orient at any particular time on any of three engagement areas.
Defend a Reverse Slope
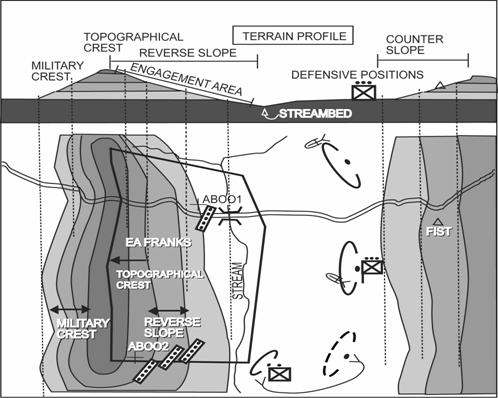
The unit leader’s analysis of the factors of METT-TC often leads him to employ his forces on the reverse slope. If the squads are on a mounted avenue of approach, they must be concealed from enemy direct fire systems. This means squads should be protected from enemy tanks and observed artillery fire.
The majority of a squad’s weapons are not effective beyond 600 meters. To reduce or prevent destruction from enemy direct and indirect fires beyond that range, a reverse-slope defense should be considered. Using this defense conflicts to some extent with the need for maximum observation forward to adjust fire on the enemy, and the need for long-range fields of fire for anti-tank weapon systems. In some cases it may be necessary for these weapons systems to be deployed forward while the squads remain on the reverse slope. Anti-tank gunners withdraw from their forward positions as the battle closes. Their new positions should be selected to take advantage of their long-range fires, and to get enfilade shots from the depth and flanks of the reverse slope.
The nature of the enemy may change at night, and the squads may occupy the forward slope or crest to deny it to the enemy. In these circumstances, it is feasible for a squad to have an alternate night position forward. The area forward of the topographical crest must be controlled by friendly forces through aggressive patrolling and both active and passive reconnaissance measures. The unit should use all of its night vision devices to deny the enemy undetected entry into the unit’s defensive area. anti-tank weapon systems are key parts of the unit's surveillance plan and should be positioned to take advantage of their thermal sights. The enemy must not be allowed to take advantage of reduced visibility to advance to a position of advantage without being taken under fire.
8-139. The company commander normally makes the decision to position units on a reverse slope. He does so when--
• He wishes to surprise or deceive the enemy about the location of his defensive position.
• Forward slope positions might be made weak by direct enemy fire.
• Occupation of the forward slope is not essential to achieve depth and mutual support.
• Fields of fire on the reverse slope are better or at least sufficient to accomplish the mission.
• Forward slope positions are likely to be the target of concentrated enemy artillery fires.
The following are advantages of a reverse-slope defense:
• Enemy observation of the position, including the use of surveillance devices and radar, is masked.
• Enemy cannot engage the position with direct fire without coming within range of the defender’s weapons.
• Enemy indirect fire will be less effective because of the lack of observation.
• Enemy may be deceived about the strength and location of positions.
• Defenders have more freedom of movement out of sight of the enemy.
Disadvantages of a reverse-slope defense include the following:
• Observation to the front is limited.
• Fields of fire to the front are reduced.
• Enemy can begin his assault from a closer range.
Obstacles are necessary in a reverse-slope defense. Because the enemy will be engaged at close range, obstacles should prevent the enemy from closing too quickly and overrunning the positions. Obstacles on the reverse slope can halt, disrupt, and expose enemy vehicles to flank antitank fires. Obstacles should also block the enemy to facilitate the unit’s disengagement.
Common Defensive Control Measures
1. Battle Positions
A battle position is a defensive location oriented on a likely enemy avenue of approach. The battle position is an intent graphic that depicts the location and general orientation of the majority of the defending forces. A commander's use of a battle position does not direct the position of the subordinate's entire force within its bounds since it is not an AO. Units as large as battalions and as small as squads or fireteams use battle positions. They may occupy the topographical crest of a hill, a forward slope, a reverse slope, or a combination of these areas. The commander selects his positions based on terrain, enemy capabilities, and friendly capabilities. A commander can assign all or some of his subordinates battle positions within his AO.
2. Direct Control
The commander engages the enemy force with all available defensive fires when they enter the defending unit's EA. These are defined as direct fire control measures, such as target reference points and engagement areas.
3. Disengagement Line
A disengagement line is a phase line located on identifiable terrain that, when crossed by the enemy, signals to defending elements that it is time to displace to their next positions. The commander uses these lines in the delay and the defense when he does not intend for the defending unit to become decisively engaged. He establishes criteria for the disengagement, such as number of enemy vehicles by type, friendly losses, or enemy movement to flanking locations. Multiple disengagement lines, one for each system in the defense, may exist.
4. Fire Support Coordination Measure
A Fire Support Coordination Measure (FSCM) is one of any number of means to facilitate planning and executing rapid engagement of targets with the appropriate weapon or group of weapons, while simultaneously providing safeguards for everything else on the battlefield. The commander tries to engage the enemy at extended ranges and attrit him as his attack advances. He can also employ final protective fires.
Final protective fires (FPFs) are immediately available preplanned barriers of fires designed to impede enemy movement across defensive lines or areas. Both direct- and indirect- fire weapons can provide FPFs. The commander can only assign each firing battery or platoon a single FPF. A FPF is a priority target for an element or system, and those fire units are laid on that target when they are not engaged in other fire missions. When the enemy initiates his final assault into a defensive position, the defending unit initiates its FPFs to kill enemy infantry troops and suppress his armored vehicles. Selected crew-served weapons fire along predesignated final protective lines (FPLs) to break up infantry assaults.
5. Forward Edge of the Battle Area
The forward edge of the battle area (FEBA) is the foremost limits of a series of areas in which ground combat units are deployed, excluding the areas in which the covering or screening forces are operating, designated to coordinate fire support, the positioning of forces, or the maneuver of units. The U.S. Army uses a FEBA only in defensive operations whereas the U.S. Marine Corps uses a FEBA in both offensive and defensive capacity. The FEBA is not a boundary, but conveys the commander's intent. It marks the foremost limits of the areas in which the preponderance of ground combat units deploy, excluding the areas in which security forces are operating. MBA forces can temporarily move forward of the FEBA to expedite the retrograde operations of security forces. The commander designates a FEBA to coordinate fire support and to maneuver his forces. A phase line designating the forward-most point of the MBA indicates the FEBA. The FEBA shows the senior commander's planned limit for the effects of direct fires by defending forces. Defending units must address this area in their scheme of maneuver and exchange information regarding tactical plans at the coordinating points.
6. Main Battle Area
The main battle area (MBA) is the area where the commander intends to deploy the bulk of his combat power and conduct his decisive operations to defeat an attacking enemy. In the defense, the commander's major advantage is that he normally selects the ground on which the battle takes place. He positions his forces in mutually supporting positions in depth to absorb enemy penetrations or canalize them into prepared engagement areas, defeating the enemy's attack by concentrating the effects of overwhelming combat power. The natural defensive strength of the position has a direct bearing on the distribution of forces in relation to both frontage and depth. In addition, defending units typically employ field fortifications and obstacles to improve the terrain's natural defensive strength. The MBA also includes the area where the defending force creates an opportunity to deliver a decisive counterattack to defeat or destroy the enemy.
The MBA extends from the FEBA to the unit's rear boundary. The commander locates his subordinate unit boundaries along identifiable terrain features and extends them out beyond the front line of own troops by establishing forward boundaries. Unit boundaries should not split avenues of approach or key terrain. The commander selects the MBA based on the products of the intelligence preparation
Sequence of the Defense
As part of a larger element, a unit conducts defensive operations in a sequence of integrated and overlapping phases. This section focuses on the following phases within the sequence of the defense:
1. Reconnaissance, security operations, and enemy preparatory fires,
2. Occupation.
3. Approach of the enemy main attack.
4. Enemy assault.
5. Counterattack.
6. Consolidation and reorganization.
1. Reconnaissance, security operations, and enemy preparatory fires,
2. Occupation.
3. Approach of the enemy main attack.
4. Enemy assault.
5. Counterattack.
6. Consolidation and reorganization.
Reconnaissance, security operations, and enemy preparatory fires.
Security forces must protect friendly forces in the main battle area (MBA) and allow them to prepare for the defense. The goals of a security force include providing early warning, destroying enemy reconnaissance elements (within its capability), and disrupting enemy forward detachments or advance guard elements. The unit may be attached to a larger element or remain with the parent company to conduct counter-reconnaissance. Additionally, the unit may conduct security operations as part of the company defensive plan by conducting patrols or manning observation post(s) (OP) to observe named area(s) of interest (NAI).
The unit may also be required to provide guides to the passing friendly security force and may be tasked to close the passage lanes. The passage could be for friendly forces entering or departing the security zone, and may include logistics units supporting the security forces. The unit, as part of a larger force, may also play a role in shaping the battlefield. The battalion or brigade combat team commander may position the company to deny likely enemy attack corridors. This will enhance flexibility and force enemy elements into friendly engagement areas.
When not conducting security or preparation tasks, the Infantry unit normally occupies dug-in positions with overhead cover to avoid possible enemy artillery preparatory fires.
• Counterattack.
• Consolidation and reorganization.
Occupation.
The occupation phase of the defense includes moving from one location to the defensive location. A quartering party under company control normally leads this movement to clear the defensive position and prepares it for occupation. The unit plans, reconnoiters, and then occupies the defensive position and establishes security forces. The remaining forces prepare the defense. To facilitate maximum time for planning, occupying, and preparing the defense, leaders and troops at all levels must understand their duties and responsibilities, including priorities of work (covered in the WARNO or by a unit TSOP).
Occupation and preparation of the defense site is conducted concurrently with the TLP and the development of the engagement area (if required). The unit occupies defensive positions in accordance the commander’s plan and the results of the unit’s reconnaissance. To ensure an effective and efficient occupation, the reconnaissance element marks the friendly positions. These tentative positions are then entered on the operational graphics. Each unit moves in or is led in by a guide to its marker. Once in position, each unit leader checks his position location. As the unit occupies its positions, the unit leader manages the positioning of each subordinate unit to ensure they locate in accordance with the tentative plan. If the unit leader notes discrepancies between actual positioning of the subordinate units and his plan, he makes the corrections. Security is placed out in front of the unit. The unit leader must personally walk the fighting positions to ensure that everyone understands the plan and that the following are in accordance with the plan:
• Weapons orientation and general sectors of fire.
• Crew served weapons positions.
• Squads’ positions in relation to each other.
Each junior leader ensures he knows the location of the senior leader and senior non-commissioned officer for command and control purposes, and where the casualty collection point is located. The unit may be required to assist engineers in the construction of tactical obstacles in their sector. All leaders must know where these obstacles are so they can tie them into their fire plan.
When the occupation is complete, subordinate leaders can begin to develop their sector sketches based on the basic fire plan developed during the leader’s reconnaissance. Positions are improved when the direct fire plan is finalized and proofed. In addition to establishing the unit’s primary positions, the unit leader and subordinate leaders normally plan for preparation and occupation of alternate, supplementary, and subsequent positions. This is done in accordance with the company order. The unit reserve need to know the location of these positions.
Approach of the enemy main attack
As approach of the enemy main attack begins, higher headquarters engage the enemy at long range using indirect fires, electronic warfare, attack aviation, and close air support (CAS). The goal is to use these assets and disrupting obstacles to shape the battlefield and/or to slow the enemy’s advance and break up his formations, leaving him more susceptible to the effects of crew served weapons. As the enemy’s main body echelon approaches the battalion engagement area, the battalion may initiate indirect fires and CAS to weaken the enemy through attrition. At the same time, higher headquarter’s effort shifts to second-echelon forces, depending on the commander’s plan. Based on an event stated in the company commander’s order, Infantry units cease security patrols and bring OPs back into the defense at a predetermined time. Positions may be shifted in response to enemy actions or other tactical factors.
Enemy Assault
During an enemy assault attacking enemy forces attempt to fix and finish friendly forces. Their mission will be similar to those in friendly offensive operations: destroy forces, seize terrain, and conduct a penetration to pass follow-on forces through. During execution of the defense, friendly forces will mass the effects of fires to destroy the assaulting enemy. The unit leader must determine if the unit can destroy the enemy from its assigned positions.
Fighting From Assigned Positions
If the unit can destroy the enemy from its assigned positions, the unit continues to fight the defense.
The unit leader continues to call for indirect fires as the enemy approaches. The unit begins to engage the enemy at their weapon systems’ maximum effective range. They attempt to mass fires and initiate them simultaneously to achieve maximum weapons effects. Indirect fires and obstacles integrated with direct fires should disrupt the enemy’s formations, channel him toward EAs, prevent or severely limit his ability to observe the location of friendly positions, and destroy him as he attempts to breach tactical and or protective obstacles. If there is no forward air controller (FAC) available, the forward observer or unitleader will be prepared to give terminal guidance to attack aviation if available and committed into his area of operations.
Leaders control fires using standard commands, pyrotechnics, and other prearranged signals. The Infantry unit increases the intensity of fires as the enemy closes within range of additional friendly weapons. Leaders work to achieve a sustained rate of fire from their positions by having buddy teams engage the enemy so both troops are not reloading their weapons at the same time. To control and distribute fires, leaders consider--
• Range to the enemy.
• Engagement criteria (what to fire at, when to fire [triggers], and why).
• Most dangerous or closest enemy targets.
• Shifting to concentrate direct fires either independently or as directed by higher headquarters.
• Ability of the unit to engage dismounted enemy with enfilading, grazing fires.
• Ability of the unit's heavy weapons to achieve flank shots against enemy vehicles.
When the enemy closes on the unit’s protective wire, machine guns fire along interlocking principal direction(s) of fire (PDF) or final protective line(s) (FPL) as previously planned and designated. Other weapons fire at their designated PDFs. Grenadiers engage the enemy with grenade launchers in dead space or as the enemy attempts to breach protective wire. The unit leader requests final protective fire (FPF) if it is assigned in support of his positions.
The unit continues to defend until it repels the enemy, is ordered to disengage or is dead.
Fighting From Other Than Assigned Positions
If the unit cannot destroy the enemy from its assigned positions, the unit leader reports the situation to his commander and continues to engage the enemy. He repositions the unit (or subunits) when directed by the commander in order to--
• Continue fires into the unit engagement area.
• Occupy supplementary or alternate positions.
• Reinforce other parts of the company.
• Counterattack locally to retake lost fighting positions.
• Withdraw from an indefensible position using fire and movement to break contact.
NOTE: The unit leader does not move his unit out of position if it will destroy the integrity of the defense. All movements and actions to reposition squads and the unit must be thoroughly rehearsed.
Counterattack
As the enemy’s momentum is slowed or stopped, friendly forces may counterattack. The counterattack may be launched to seize the initiative from the enemy or to completely halt his attack. In some cases, the purpose of the counterattack will be mainly defensive (for example, to reestablish the forward edge of the battle area [FEBA] or to restore control of the area). The unit may participate in the counterattack as a base-of-fire element or as the counterattack force. This counterattack could be planned or conducted during the battle when opportunities to seize the initiative present themselves.
Consolidation and Reorganization
The unit secures its sector and reestablishes the defense by repositioning friendly forces, destroying enemy elements, treating and evacuating casualties, processing EPWs, and reestablishing obstacles. The unit conducts all necessary sustainment functions, such as cross-leveling ammunition and weapons, as it prepares to continue defending. Subordinate Leaders provide liquid, ammunition, casualty, and equipment (LACE) reports to the unit leader. The unit leader reestablishes the unit chain of command. He consolidates reports and provides the unit report to the next higher leader. The senior non-commissioned officer coordinates for resupply and supervises the execution of the casualty and EPW evacuation plan. The unit continues to repair or improve positions, quickly reestablishes observation posts, and resumes security patrolling as directed.
Consolidation includes organizing and strengthening a position so it can continue to be used against the enemy. Unt consolidation requirements include:
• Adjusting other positions to maintain mutual support.
• Reoccupying and repairing positions and preparing for renewed enemy attack.
• Relocating selected weapons to alternate positions if leaders believe the enemy may have pinpointed them during the initial attack.
• Repairing any damaged obstacles and replacing any Claymore mines.
• Reestablishing security and communications.
Reorganization includes shifting internal resources within a degraded friendly unit to increase its level of combat effectiveness. Unit consolidation requirements include:
• Manning key weapons as necessary.
• Providing first aid and preparing wounded troops for CASEVAC.
• Redistributing ammunition and supplies.
• Processing and evacuating EPWs.
Fighting Positions
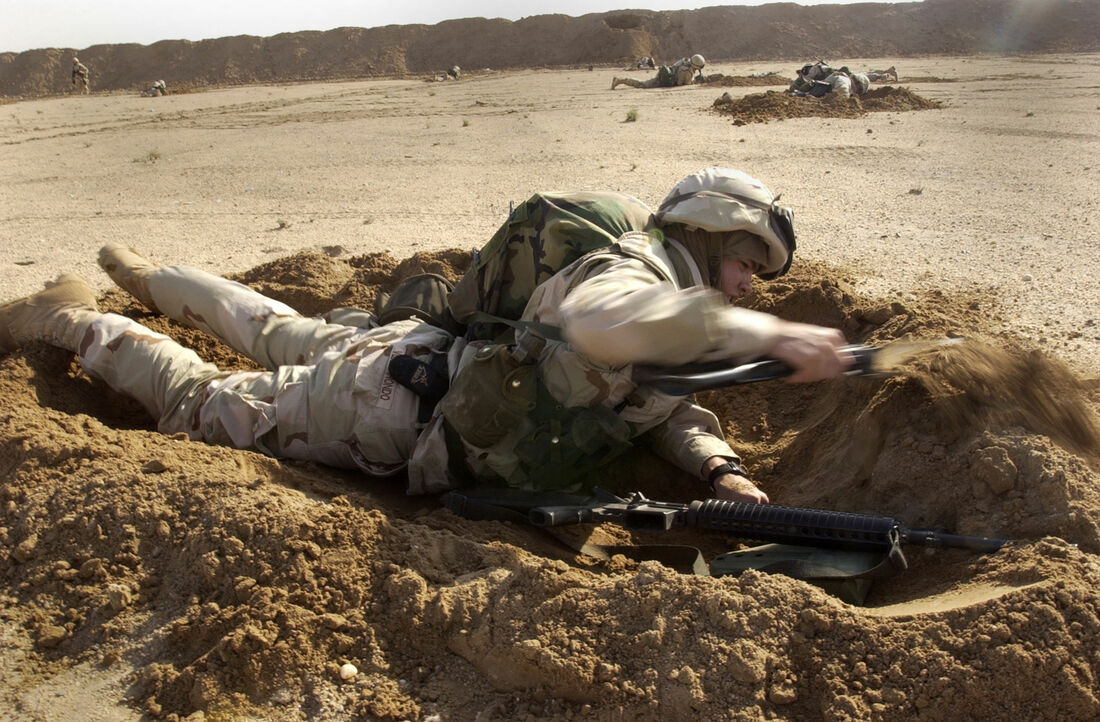
A defensive fighting position (DFP) is a type of earthwork constructed in a military context, generally large enough to accommodate anything from one trooper to a fire team (or similar sized unit).
Whether a unit is in a defensive perimeter or on an ambush line, it is imperative that they seek cover from fire, and concealment from observation. From the time to prepare and occupy a fighting position, it should be sought to improve it. How far well a fighting position is established depends on how much time the unit has, regardless of whether it is a hasty position or a well-prepared one with overhead cover (OHC).
Whether a unit is in a defensive perimeter or on an ambush line, it is imperative that they seek cover from fire, and concealment from observation. From the time to prepare and occupy a fighting position, it should be sought to improve it. How far well a fighting position is established depends on how much time the unit has, regardless of whether it is a hasty position or a well-prepared one with overhead cover (OHC).
Primary
The best available position from which the assigned sector of fire is covered. Individuals, fire teams, squads, and crew-served weapons are assigned primary positions.
Alternate
A different fighting position so that a unit can continue to accomplish its original mission when the primary position becomes untenable or unsuited for carrying out that mission. Alternate positions are not normally assigned to individuals or squads within the unit. They are used primarily by crew-served weapons.
Supplementary
These positions are oriented in a different direction than the primary positions. Supplementary positions are prepared to guard against attack from directions other than those from which the main attack is expected. A supplementary position is a secondary position that does not cover the same sector of fire as the primary position. Supplementary positions are for security reasons and ensure protection, when occupied against surprise enemy attack from an unexpected direction. Movements to supplementary positions and concealed routes are covered to avoid enemy detection.
Supplementary and alternate fighting positions provide flexibility to the defensive line. They are used in the event that the enemy attacks from a different location other than that which the primary positions are oriented.
Supplementary and alternate fighting positions provide flexibility to the defensive line. They are used in the event that the enemy attacks from a different location other than that which the primary positions are oriented.
Subsequent
A fighting position that the unit expects to move to during the fighting, either in offensive or defensive capacity. Subsequent positions can also have primary, alternate, and supplementary positions associated with them.
Strong Point
A Heavily fortified battle position tied to a natural or reinforcing obstacle to create an anchor for the defense or to deny the enemy decisive or key terrain. The Strong Point is where the main effort of defense is concentrated. Typically, companies and platoons are assigned Strong Points. Strong Points are typically made up of a series of sectors of fire that support and interlock one another. Based on the battle position of the company, platoon battle positions are assigned a right and left limit of fire in which gunfire can be delivered.
Sectors of Fire

A sector of fire is an area of responsibility assigned to a squad, a platoon, or a crew-served weapon to be covered by fire. The squad sector of fire is divided into fire teams and individual sectors of fire to cover the entire squad sector by fire. The primary sector of fire is typically to the oblique of your position, and the secondary sector of fire is to the front.
1. Primary
The main area from which the unit will engage the enemy from. A primary sector includes an final protective line, a principal direction of fire, or a target reference point.
• Final Protective Line is a line on which you engage grazing fire across your unit's front. The FPL will be assigned to you only if your leader determines there is a good distance of grazing fire. If there is, the FPL will then dictate the location of the primary sector. The FPL will become the primary sector limit (right or left) closest to friendly troops. When not firing at other targets, you will lay your gun on the FPL or PDF.
• Principal Direction of Fire is when the terrain does not lend itself to an FPL and instead your team leader assigns you a direction. The direction should be toward a gully or down a ditch that leads into your position. The gun is positioned to fire directly down this approach rather than across the unit's front.
• Target Reference Points are natural or manmade features within your sector that can be used for quick location of targets. Target reference points are used primarily for controlling direct fire weapons only; however, TRP should appear on the company target list.
2. Secondary
Secondary sectors of fire are additional assigned sectors from which the enemy may also attack or engage from. Fire into your secondary sector of fire only if there are no targets in your primary sector, or if ordered to fire there.
Transition from Defensive/Offensive Operations
A transition occurs when a commander makes the assessment that a unit must change its focus from one element of decisive action to another.
• Offensive
• Consolidation of Gains (Stability)
• Defensive
• Offensive
• Consolidation of Gains (Stability)
• Defensive
Transfer from Offensive/Defensive mission profiles to:
• Replenish and update combat power
• Prepare for next form of objective
• Replenish and update combat power
• Prepare for next form of objective
Transition to Defense
A commander halts the offense only when it reaches the echelon's LOA, results in complete victory and the end of hostilities, reaches a culminating point, or after receiving a change in mission from a higher echelon commander.
All offensive tasks that do not achieve complete victory reach a culminating point when the balance of combat power shifts from the attacking force to its opponent. Units performing offensive tasks lose momentum and may culminate when--
• Suffering heavy losses of personnel and equipment.
• They encounter heavily defended areas they cannot bypass.
• The resupply of fuel, ammunition, and other supplies fails to keep up with expenditures.
• Troops become physically exhausted.
• Equipment repairs and personnel replacements do not keep pace with losses.
• The commander determines that advancing further will be to the detriment of the force. (Examples of this include moving out of mutual supporting distance with adjacent units or determining that
• The force lacks the enablers necessary to continue the advance.
Attacking units may also slow or stop when reserves are not available to continue an advance, the defender receives reinforcements, or the defender counterattacks. Several of these causes may combine to halt an offense. When this occurs, the attacking unit can regain its momentum, but normally this only happens after difficult fighting, the commitment of additional forces, or after an operational pause.
If commanders cannot secure decisive objectives before subordinate forces reach their culminating points, they plan a pause to adjust the operation accordingly. Simultaneously, commanders attempt to prevent an enemy force from knowing when friendly forces become overextended.
Commanders retain greater flexibility for the defense if they begin preparations before the force culminates. This may allow commanders to dictate where they fight the defense. Commanders can plan future activities to aid the defense, minimize vulnerability to attack, and facilitate renewal of the offense as a force transitions to branches or sequels of an ongoing operation. For example, some of a commander's subordinate units may move into battle positions before the entire unit terminates the current offensive task. Commanders can echelon sustainment assets forward to establish a new echelon support area.
Commanders who anticipate a transition from offense to defense prepare orders to address when it occurs, what subordinate units will do, and necessary control measures. As a unit transitions from an offensive focus to a defensive focus, its commander--
• Maintains contact and surveillance of enemy forces, using a combination of reconnaissance units and surveillance assets to develop the information required to plan future actions.
• Establishes a security area, security force, and local security measures.
• Redeploys artillery assets to ensure the support of security forces.
• Redeploys forces for probable future employment.
• Maintains or regains contact with adjacent units in a contiguous AO and ensures that units remain
• capable of mutual support when operating with noncontiguous areas of operations.
• Shifts the engineer emphasis from mobility to countermobility and survivability.
• Consolidates and reorganizes.
• Explains the rationale for transitioning from the offense to the unit's leaders and troops.
Commanders conduct reorganization and resupply concurrently with other transition activities. This requires a transition in the sustainment effort. It shifts emphasis from ensuring a force's ability to move forward (including resupply of POL, forward repair and maintenance, and replacing combat losses) to ensuring the force's ability to defend at a chosen location. A transition is often a time when units can perform equipment maintenance. Additional assets may also be available for casualty evacuation and medical treatment because of a reduction in tempo.
It is difficult to transition to the defense without prior planning. Defensive preparations which are not deliberately prepared are hasty, almost always initially characterized by severe time and resource constraints. Forces establishing a hasty defense may be dispersed and lacking combat power due to losses. Moreover, the shift to the defense requires a psychological adjustment. Troops who have become accustomed to advancing must now halt and fight defensively on often unfavorable terms.
Commanders can use two techniques when transitioning to a defense. The first technique is for the leading elements to commit forces and push forward to seize enough favorable ground to establish a forward security area. The main force moves forward or rearward as necessary to occupy key terrain and institutes a hasty defense that progresses into a deliberate defense as time and resources allow or until it can regenerate sufficient combat power to continue the offense. The second technique is to establish a forward security area with part of the force, generally along the unit's final line of advance, and move the main body rearward to defensible terrain. In both methods, the security area should be deep enough to keep the main body initially out of the range of enemy medium artillery.
In the first technique, the security area often lacks depth because the force does not possess sufficient combat power to seize required terrain.
In the second technique, enemy forces can accurately template the forward trace of friendly units and engage them with fires. Both options can result in the loss of additional combat power and ultimately the expenditure of more resources.
If a commander determines that it is necessary to stop an offensive task and conduct a retrograde operation, subordinate units may conduct an area defense from their current locations until their activities can be synchronized to conduct the retrograde operation. The amount of effort expended in establishing an area defense depends on the prevailing mission variables.
Transition to Consolidation of Gains
At some point, units transition from one phase of major operations or campaign plan to another and
begin executing a sequel to their operations order. Successful completion of the current offense task may not be decisive. The performance of the tasks associated with consolidation of gains may be the decisive
operation in a major operation or campaign. The transition to a focus on area security and stability tasks
cannot be an afterthought. Creating the conditions for the consolidation of gains, especially its associated
security and stability tasks, may have significant impact on the planning and execution of offensive tasks.
When appropriate, a commander designates a consolidation area during the offense or defense. A
consolidation area is the portion of the commander's AO that is designated to facilitate the security and
stability tasks necessary for freedom of action in the close area and to support the continuous consolidation of gains.
If a force achieves its tactical objectives, and the situation makes a focus on the performance of
defensive tasks inappropriate, commanders transition to a security and stability focus. The commander's
concept of operations and intent drives the design and planning for security and stability tasks. Generally,
tactical commanders focus on meeting the minimum-essential stability tasks by providing security and
insuring the provision of essential food, water, shelter, and medical treatment services to the civilian
inhabitants of their AO. This occurs in coordination with any existing civil institutions and nongovernmental organizations before addressing the other primary stability tasks.
When involved in other missions, such as peace operations, irregular warfare, and military
engagement, unit offensive missions closely relate to the movement to contact tasks of search and attack or cordon and search. The performance of offensive tasks in these other missions will normally employ
restrictive rules of engagement throughout a mission, regardless of the dominant type of action at any specific moment. When executing tasks within these other missions, the emphasis on the stability element is much more dominant than the defensive element of decisive action.
Transition from Defense to Stability
The transition to consolidation of gains and the performance of stability tasks is conditional, but commanders should plan for it in advance. A defending commander may transition to consolidation of gains if the defending commander retained decisive terrain, denied vital areas to enemy forces, and attrited the attacking enemy forces to the extent that the performance of offensive tasks is unnecessary. As in other operations, the commander's concept of operations and intent drive the design of and planning for stability tasks. Generally, a tactical commander will focus on meeting the primary tasks of restoring essential services and establishing civil security needs of the civilian inhabitants of the AO in coordination with other U.S. government agencies and the host-nation populations, institutions, and nongovernmental organizations operating in the area before addressing the other primary stability tasks. Support requirements may change dramatically. Commanders will probably change the rules of engagement, and these changes must be effectively conveyed down to the individual troop level.
When commanders transition their emphasis from a defense to consolidation of gains and the performance of stability tasks, their units will probably begin executing sequels to their previous operations order. Commanders will probably reorganize their units to introduce those capabilities required by changes in the situation. Depending on the specific operational environment, commanders and staffs should reference the appropriate official departmental publications dealing with other missions and tasks o refresh previous training and education on those subjects. If commanders and staffs are unfamiliar with the civil considerations of their AOs, they should refer to area histories, cultural and economic studies, and similar reference materials. The mission command and protection functions remain important to prevent troops from relaxing discipline and safety standards as the stress of active defensive tasks disappears.
When involved in other operations, such as peace operations, irregular warfare, and military engagement, the performance of a unit defense is closely related to perimeter defense, physical security procedures, and antiterrorism measures. Protection doctrine addresses the conduct of base security. The performance of defensive tasks in operational environments common to these missions will normally employ restrictive rules of engagement, regardless of which element of decisive action is dominant at any specific moment.
Transition to the Offense
Defending commanders anticipate the success of their defense and their transition to the offense. If a defense is unsuccessful, defending commanders transition into retrograde operations. Transition from one type of operation or task to another requires mental as well as physical agility from the involved formations and an accurate understanding of the situation.
Commanders deliberately plan for the transition process and allow the setting of the conditions necessary for a successful transition. Such planning addresses the need to control the tempo of operations, maintain contact with both enemy and friendly forces, and keep an enemy force off balance. It establishes the procedures and priorities by which a unit prepares for its next mission. It establishes the required organization of forces and control measures necessary for success in accordance with the mission variables.
Prior contingency planning decreases the time needed to adjust the tempo of combat operations when a unit transitions from the performance of defensive tasks to the performance of offensive tasks. This planning allowing subordinate units to conduct parallel planning and prepare for subsequent operations. Preparations include resupplying unit basic loads and repositioning or reallocating supporting systems.
A commander's effective contingency planning also reduces the amount of time and confusion when a unit is unsuccessful in its defensive efforts and must transition to retrograde operations. Commanders designate units to conduct denial operations and to evacuate casualties and inoperative equipment. Commanders use retrograde operations to preserve their forces as combat capable formations until they can establish those conditions necessary for a successful defense. Unit contingency plans should account for both failure and success, and they should account for a transition to consolidation of gains or stability tasks.
A defending commander transitions to a focus on offensive tasks by anticipating when and where an enemy force will reach its culminating point or require an operational pause before it can continue. At those moments the combat power ratios most favor a defending force. An enemy force will do everything it can to keep a friendly force from knowing when it is overextended. Indicators that an enemy force is becoming overextended include when--
• Enemy forces begin to transition to the defense—this defense may be by forces in or out of contact with friendly forces.
• Enemy forces suffer heavy losses.
• Enemy forces start to deploy before encountering friendly forces.
• Enemy forces are defeated in most engagements.
• Enemy forces are committed piecemeal in continued attacks.
• Enemy aviation forces are used in place of ineffective ground forces.
• Enemy reserve forces are identified among attacking forces.
• Examination of captured or killed enemy troops and captured or destroyed enemy equipment and supplies shows that the enemy forces cannot adequately sustain themselves.
• Enemy forces have a noticeable reduction in their tempo of operations.
• Local counterattacks meet with unexpected success.
Commanders must be careful not to be successfully targeted by enemy information activities and other messages designed to tempt commanders to prematurely abandon prepared defensive positions.
In a mobile defense, transitioning to an offense generally follows a striking force's attack. In an area defense, commanders designate a portion of their force to conduct the counterattack, selecting units based on the commander's concept of operations. However, commanders allocate available reserves to this counterattack effort.
Commanders conduct required reorganization and resupply to support the offense. This requires a transition in the sustainment effort, with a shift in emphasis from ensuring a capability to defend from a chosen location to an emphasis on ensuring a force's ability to advance and maneuver. For example, in a defense the sustainment effort may have focused on the forward stockage of Class IV and V items and the rapid evacuation of combat damaged systems. In an offense, the sustainment effort may need to focus on providing POL, forward repair and maintenance, and replacement of combat losses. A transition is often a time in which deferred equipment maintenance can be performed. Additional assets may also be available on a temporary basis for casualty evacuation and medical treatment because of a reduction in the tempo of operations.
Commanders should not wait too long to transition from a defense to an offense as an enemy force approaches its culminating point. Enemy forces will be dispersed, extended in depth, and weakened. At that time, any enemy defensive preparations will be hasty, and enemy forces will not be adequately disposed for defense. Commanders want enemy forces in this posture when transitioning to the offense, and they do not want to give an enemy force time to prepare for the defense. Additionally, the psychological shock on enemy troops will be greater if they suddenly find themselves desperately defending on new and often unfavorable terms.
There are two methods for transitioning to an offense. The first, and generally preferred method, is to attack using forces not previously committed to a defense. This is because defending units may still be decisively engaged, tired, or depleted. These attacking forces may come from the reserve or consist of reinforcements. Since these forces have not recently been actively involved in combat, they are more likely to--
• Be at authorized strength levels.
• Have a higher combat system operationally ready rate.
• Have leaders and troops who are more likely to be rested and more capable of prolonged, continuous operations.
• Have a complete basic load of supplies.
• Have the time and energy to plan and prepare to perform offensive tasks.
• Be able to maneuver out of physical contact with an enemy force.
A drawback to this method is the requirement to conduct a forward passage of lines. Additionally, enemy intelligence assets are likely to detect the arrival of significant reinforcements.
The second method is to perform offensive tasks using currently defending forces. This method generally has the advantage of being more rapidly executed and thus more likely to catch an enemy force by surprise. Speed of execution in this method results from not having to conduct an approach or tactical roadmarch from reserve assembly areas or, in the case of reinforcements, move from other areas of operations and reception, staging, organization, and integration locations. Speed also results from not having to conduct a forward passage of lines and performing the liaison necessary to establish a common operational picture that includes knowledge of the enemy force's patterns of operation. The primary disadvantage of this method is that an attacking force generally lacks stamina and must be quickly replaced if friendly offensive tasks are not to culminate quickly.
If units in contact participate in an attack, commanders must retain sufficient forces in contact to fix enemy forces. Commanders concentrate an attack by reinforcing select subordinate units so they can execute the attack and, if necessary, maintain the existing defense. Commanders can also adjust the defensive boundaries of subordinate units so entire units can withdraw and concentrate for an attack.
Transition to the Retrogade
A retrograde usually involves a combination of delay, withdrawal, and retirement operations. These operations may occur simultaneously or sequentially. As in other operations, the commander's concept of operations and intent drive planning for a retrograde. Each form of retrograde has its unique planning considerations, but considerations common to all retrogrades are risk, the need for synchronization, and security. However, several key considerations receive special emphasis during the transition from the defense to the retrograde. For example, the transition to a retrograde must be accompanied by efforts designed to--
• Reduce an enemy force's strength and combat power.
• Provide friendly reinforcements.
• Concentrate forces elsewhere for the attack.
• Prepare stronger defenses elsewhere within an AO.
• Lure or force part or all of an enemy force into areas where it can be counterattacked.
The complexity and fluidity of a retrograde and the absolute need to synchronize the entire operation dictates the need for detailed, centralized planning and decentralized execution. Planning for a retrograde begins with the preparation of plans for the follow-on mission and is driven by the commander's concept of operations and intent.
The nature of a retrograde involves an inherent risk of degrading a defending force's morale. Therefore, maintaining offensive spirit is essential among subordinate leaders and troops. Rearward movements may be seen as a defeat or as an action that could result in isolation of the force. Commanders must be well forward and visible. Commanders must ensure that subordinate leaders and troops understand the purpose and intent of the retrograde and their role in accomplishing the mission. Thorough planning, effective control, and aggressive leadership will minimize risk during a retrograde and enhance its probability of success.
Intelligence requirements dramatically increase as forces begin their movements to other locations, and the combat capabilities of units in contact are subsequently reduced. Commanders develop an information collection plan to identify and locate enemy attempts to pursue, outflank, and isolate a defending force within all domains that could affect that unit as it transitions to a retrograde. As commanders transition to a retrograde, they make every effort to conserve combat power. Commanders also consider the need to--
• Conserve combat power while remaining dispersed to achieve the intent of the defensive mission.
• Disengage and withdraw units with the least tactical mobility and nonessential elements before the retrograde of the main body.
• Use air and missile defense forces to cover the retrograde against enemy aerial surveillance and attack by exploiting or pursuing enemy forces.
• Use mobile forces to cover the retrograde of less mobile forces.
• Use the minimum essential combat power necessary to provide security for the main body.
Rates of Fire
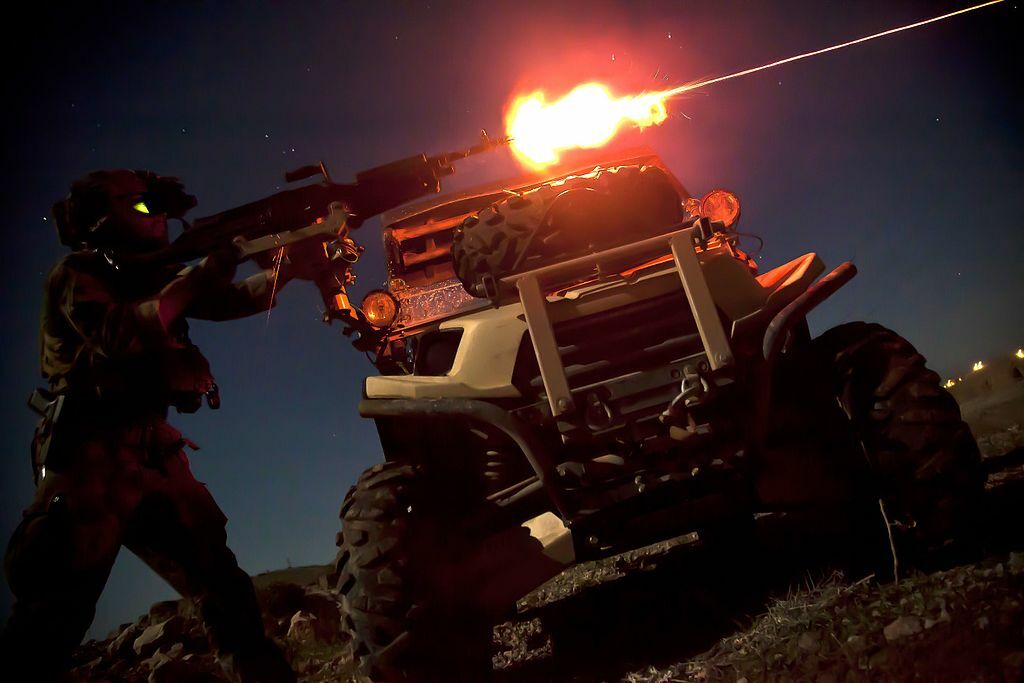
Cyclic
Fully automatic fire - 600 to 950 rounds per minute. Barrel change every minute.
Rapid
High cadence - 200 rounds per minute (6-9 round burst with 2-3 seconds between bursts). Barrel change every 2 minutes.
Sustained
Slow cadence - 100 rounds per minute (6-9 round burst with 4-5 seconds between bursts). Barrel change every 10 minutes.
Infantry Terminology
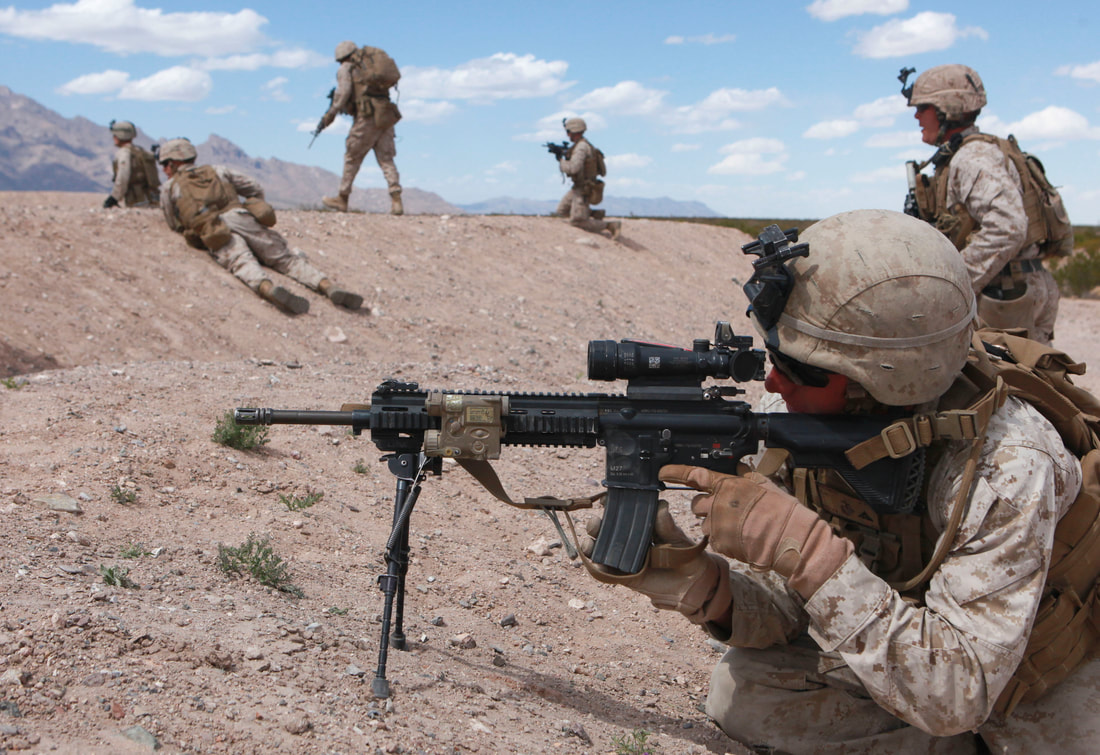
Action
Alert to important activity, generally contact is used in place of Action but both are acceptable.
Ex: "Action front! Dismounted infantry 100 meters in the open"
Advance
To move forward
Base of Fire
When a unit(s) creates suppressing fire(s) in order to facilitate others while they maneuver on the objective.
Shift Fire
Shoot at a 45 degree angle.
Life Fire
Stop firing (unless directed to do so at specific targets). The more common term is cease fire.
Pre-Combat Checks (PCC)
Checks made by individual troops for the necessary equipment needed.
Pre-Combat Inspection (PCI)
Inspection check by unit leaders to ensure troops & equipment are ready.
OFFENSIVE OPERATIONS
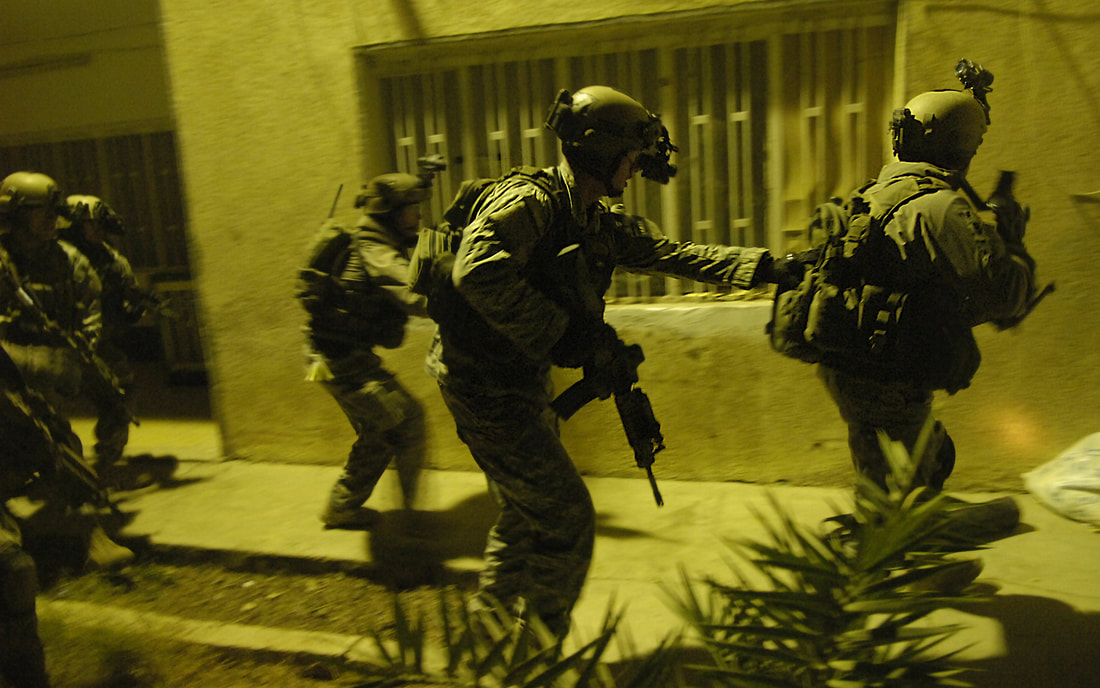
Offensive action is the decisive form of battle. The primary purpose of the offense is to defeat, destroy, or neutralize an enemy force. A commander may also take offensive actions to deceive or divert the enemy, deprive him of resources or decisive terrain, develop intelligence, or hold an enemy in position. Even in the defense, offensive action is normally required to destroy an attacker and exploit success. The key to a successful offensive operation is to identify the enemy's decisive point and choose a form of maneuver that avoids the enemy's strength and masses overwhelming combat power in order to achieve a result with respect to terrain, enemy, and time that will accomplish the unit's purpose. This section discusses the basics of the offense, which apply to all offensive actions.
The four types of offensive actions are movement to contact, attack, exploitation, and pursuit. The unit seizes, retains, and exploits the initiative in conducting offensive operations. Offensive operations are either force-oriented (focused on the enemy) or terrain-oriented (focused on seizing or securing terrain and facilities). Most offensive operations combine distinct subunit operations that have force or terrain orientations.
The four types of offensive actions are movement to contact, attack, exploitation, and pursuit. The unit seizes, retains, and exploits the initiative in conducting offensive operations. Offensive operations are either force-oriented (focused on the enemy) or terrain-oriented (focused on seizing or securing terrain and facilities). Most offensive operations combine distinct subunit operations that have force or terrain orientations.
Sequence of the Offense

Gain and Maintain Enemy Contact
The most sure-fire way to increase your chances of victory in a firefight is to ensure that your forces locate the enemy before they locate you. Finding the enemy without them knowing about you gives you initiative, and initiative will allow you to fight the enemy on the most favorable of terms, maximizing the shock of your attack, maximizing their casualties and confusion, and minimizing their ability to retaliate effectively. Finding the enemy can be facilitated through application and understanding of basic reconnaissance. Maintaining element of surprise is paramount - once the shooting starts, the "React to Contact" battle drill begins, and the next phases are initiated.
Disrupt Enemy
The principal behind disrupting enemy forces is to prevent them from mounting any form of counterattack or maintaining an effective defense. Commanders do this by attacking enemy decisive points, either simultaneously or sequentially. Massed effects of forces allow attackers to seize the initiative. The key is to deny the enemy freedom of action, enemy his sources of strength, and create the conditions for operational and tactical success.
To achieve this, a form of a spoiling attack is used. The intent of a spoiling attack is to disrupt or "spoil" the plans of the enemy force and prevent them from gaining an advantage. This is typically done by maneuvering and shifting a defensive posture while simultaneously attacking. If done properly the tactic can achieve an element of surprise which can contribute to the successful disruption or destruction of the enemy force's maneuver. Spoiling attacks are best done with fireteams and/or armor - they can spring from their positions, flank the enemy, strike hard and fast, and then draw back into a defensive posture if necessary.
To achieve this, a form of a spoiling attack is used. The intent of a spoiling attack is to disrupt or "spoil" the plans of the enemy force and prevent them from gaining an advantage. This is typically done by maneuvering and shifting a defensive posture while simultaneously attacking. If done properly the tactic can achieve an element of surprise which can contribute to the successful disruption or destruction of the enemy force's maneuver. Spoiling attacks are best done with fireteams and/or armor - they can spring from their positions, flank the enemy, strike hard and fast, and then draw back into a defensive posture if necessary.
Fix Enemy
After the enemy has been found, and leaders have maneuvered friendly forces to the most advantageous positions possible in the time available, the act of fixing the enemy begins. Methods for fixing the enemy are listed below.
• Fire Superiority. If the enemy cannot effectively shoot back or maneuver due to the amount of fire your forces are putting on them, they become fixed. Support-by-fire and base-of-fire positions are superb for achieving the kind of fire superiority that is necessary to truly fix an enemy force. Artillery and mortar fire can achieve fire superiority quite decisively as well, though they can also completely route an enemy and cause an immediate skip to finishing them.
• Dominating Positions. Finding positions which give your forces good views of the enemy allows them to engage the enemy, inflict casualties and confusion, and prevent the enemy from relocating while at the same time lessening their ability to return fire. This all contributes towards fixing them in place. Being able to fix an enemy from a higher position and cut off any ability for them to withdraw from their positions is particularly effective.
• Pressure. Fire superiority and a dominating position, applied effectively and sustained over time, establish pressure on the enemy's leaders. Maintaining pressure keeps the enemy on the defensive, reducing their ability to achieve their own goals in the firefight. Pressure applied to the enemy forces their leadership into a stressful situation in which their ability to make decisions is made increasingly difficult due to the actions of the fixing forces.
• Inflicting Casualties. As enemy casualties mount, their ability to coherently fight and be effective diminishes accordingly. While leadership targets are the best to take out, it is often difficult to pick them out in the midst of a firefight. Shooting any hostiles serves as a fine substitute - while you may not take down leaders, the fewer troops available to the enemy to fight, the more likely the next phase will help to lead to a successful conclusion of the fight. Inflicting casualties and forcing the enemy to tend to their wounded is a definite way to fix an enemy, though it is best done as a result of the above-listed methods, and not as a means to an end all by itself.
As with suppressive fire in general, the volume has significance, but the more important aspect is in making the enemy think that movement, popping up to shoot, or relocating will result in them being shot. If you cannot make the enemy think this, you haven't truly suppressed them. While they may be "fixed" in to the extent that they can't leave their position, they may be ready to fight any flanking forces regardless. Suppression is a key element of fully fixing the enemy and must be achieved for the next step to have the most chances for success.
Maneuver
The next part of a firefight occurs when the enemy has been fixed enough that a flanking maneuver can be carried out.
Flanking is a means by which friendly forces maneuver to a known or suspected point of weakness in the enemy position and exploits it via an assault. It is done when the tactical situation - terrain, enemy disposition, friendly manpower, et cetera - favor it. Flanking typically is less costly than outright frontally assaulting the enemy, and forces the enemy to split their fires between a maneuver element and a base-of-fire element, diluting their effectiveness.
Before making the decision to flank, a few things must be checked to ensure the tactical suitability of a flanking maneuver such as:
• Combat effective teams. Flanking cannot be achieved if heavy casualties have been taken. At minimum one healthy base-of-fire and one healthy assault element must be present for a flank to have a chance for success.
• Cannot be fixed or suppressed. If the enemy has fixed or suppressed your elements, flanking will only get your people killed. Moving from a position that is under concentrated and accurate enemy fire is best avoided unless in the most grave of circumstances.
• Suitable terrain or adequate cover & concealment. If the terrain does not facilitate a flanking maneuver in some capacity, it makes no sense to conduct one. Trying to flank the enemy over billiard-table flat and open terrain is a surefire way to get friendlies killed. Suitable terrain can take many forms - via vegetation concealment, cover, structures, micro-terrain, and all manner of terrain features that can provide concealed routes to the enemy.
• Have determined the enemy's position with enough certainty to reasonably judge where their flanks are located. You can't move onto a flank that you don't know the limits/position of. You can certainly try, of course, but it may end up with the flanking team putting themselves in a tough situation due to not realizing the disposition of the enemy force and becoming caught between different elements' fires.
Once the decision has been made, a portion of friendly forces are split off to conduct the flank attack. The route used is conveyed to the elements staying behind to provide suppression - known as the base-of-fire element - so that they know to expect friendlies in that area and place any fire there with great caution.
Flanking teams can be as small as a fireteam. If the enemy is properly fixed by the base-of-fire element, it may not take many flank members to roll up on the enemy's flank and chew them apart from an unexpected angle.
Ultimately, the decision for how many people are needed in the flank/assault team is up to the on-scene leaders. It is a balancing act between maintaining proper fixing fires, and having enough people in the assault force to ensure success.
While conducting a flank, the flanking team attempts to do everything in their power to remain undetected by the enemy. They move quickly, with the maximum stealth, and attack with speed, intensity, and violence of action upon working onto the enemy's flank. The shock of their attack, combined with the demoralizing effects of the base-of-fire's suppression, is a killer combination.
Follow Through
Finishing the enemy is the responsibility of the flank team primarily. Once they have closed on the enemy flank and have begun to assault enemy positions, the base-of-fire element is forced to shift fires away from the main objective to prevent hitting their own people. Note that with good coordination, a base-of-fire team can shift fires along an objective to coincide with the advances of the assault team, putting fire onto each position before the assault team gets to it, and then shifting deeper into the enemy positions as the assault teams continue to advance. This is best done when the flanking team is coming in perpendicular to the enemy position, as seen from the base-of-fire position, and when good comms are maintained between both elements.
Finishing the ultimately requires ensuring that absolutely every last enemy combatant in the area is rendered harmless, and that all possible hiding places have been searched and secured.
Finally, the firefight is finished when the enemy has been defeated and friendly forces have regrouped, established security, tended to any casualties received, redistributed special gear, dealt with any prisoners or enemy wounded, and are ready to continue on with their mission.
Task/Purpose of Offensive Missions
PRIMARY:
• DESTROY/ “KILL” the enemy.
SECONDARY:
• Control/Seize terrain
• Deny the enemy important resources & supplies
• Gain military intelligence
• Interrupt enemy actions
• Create an environment for effective future missions
• To deceive or divert the enemy
• To fix (hold) the enemy in position.
• DESTROY/ “KILL” the enemy.
SECONDARY:
• Control/Seize terrain
• Deny the enemy important resources & supplies
• Gain military intelligence
• Interrupt enemy actions
• Create an environment for effective future missions
• To deceive or divert the enemy
• To fix (hold) the enemy in position.
Attack Organization
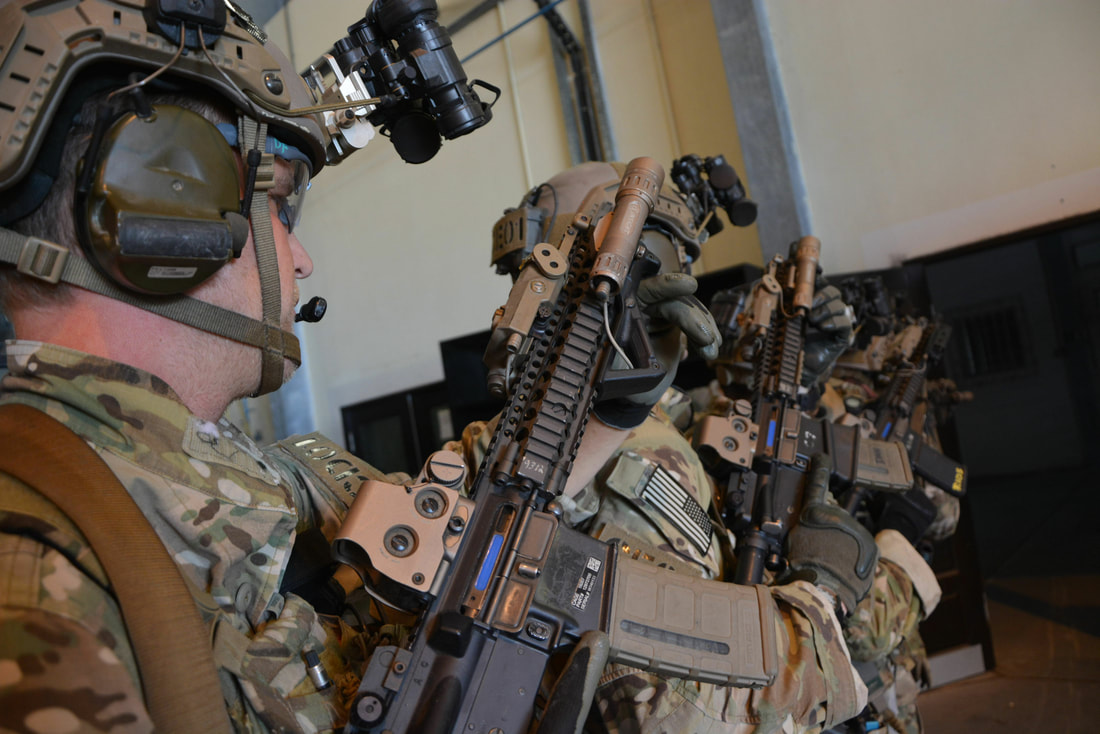
1. Security Teams
Primary objective is to cover designated sectors and ensure necessary areas and units are protected.
2. Support Team (Support by Fire)
Primary objective is to fix/suppress enemy positions to allow the maneuvering force to close with and destroy.
3. Assault Team
Primary objective is to engage in close combat and close with and destroy the enemy through the means of fire, maneuver, and assault.
4. Specialty Team (EPW/EOD/SSE)
Primary objective is to assist in completing the mission through various means as designated by unit leader. A specialty team may consist of an attached unit with a specific discipline necessary for the required mission or an organice unit with multiple disciplines. Specialty teams may include one or more disciplines but are not limited to; Demolitions & Explosive Ordnance Disposal, Marksmanship & Long-Range Precision Shooting, Enemy Prisoner of War & Intelligence Capturing Teams, etc.
Ambush Characteristics
|
Near
A 'near ambush' is defined as an ambush occurring with the enemy within grenade-throwing distance.
When an element is subjected to a 'near ambush', the action required varies depending on whether any given player is in the "kill zone" or outside of it. The voice call for a near ambush is simply "Near ambush, (direction), and should be said by the first person to identify it. Due to the confusion caused by a near ambush, the element will likely require a moment to identify the type of ambush. This means that you'll likely hear a "Contact (direction)!" call, followed by "Near ambush!" after a brief pause. Throw grenades if you can't see them; shoot otherwise. If you are in the kill zone (meaning, the enemy is focusing the bulk of their fire in your area), you must immediately return fire and take up covered or concealed positions. Immediately throw frag grenades or smoke at the enemy and assault their position once the grenades have exploded or the smoke has formed. The speed and violence of your element's reaction to the ambush will be the deciding factor as to how many of you walk away from it. If you are not in the kill zone, your job becomes one of support. Identify and engage the enemy with as much firepower as you can bring to bear, as quickly as possible. When the "kill zone" element assaults into the ambush, shift or cease fire to avoid friendly fire. |
Far
A 'far ambush', on the other hand, is any ambush in which the enemy is further than 50 meters away. These can take a multitude of forms, and the only positive aspect of them is that the increased distance of the enemy means that friendly forces can potentially maneuver better and the enemy may not be as deadly with their fire from an extended range.
Again, the action of each individual varies depending on their location within or outside of the "kill zone". The voice call for this is "Far ambush, (direction)". In practical usage, this will most likely simply be called as a normal contact report, and it will be up to the element leader to determine whether it's a meeting engagement or an actual deliberate ambush. If you are in the kill zone, immediately return fire and move to a covered or concealed position. Focus fires on enemy crew-served or high-volume weapons (machineguns) and try to knock them out as quickly as possible. Smoke grenades (both UGL and hand-thrown) can be used in two primary fashions - the first is to place them around the "kill zone" ambushed squad to conceal them from enemy fire. The other use, for the UGL smoke grenades, is to fire them at the enemy location and try to obscure their view of friendly forces. In a far ambush, the ambushed element does not attempt to assault through the ambush. Instead, they form a base of fire while the elements not in the kill zone maneuver against the ambushing enemy force. Once the maneuvering team begins to assault the enemy ambush team, the base of fire team should shift or cease fire to avoid friendly casualties. If you are not in the kill zone, your job is to flank and knock out the enemy ambush element. You should move with your element via covered/concealed routes when possible and try to work your way onto a vulnerable enemy flank. Ensure that you notify the base-of-fire element when you begin the close assault on the enemy to avoid friendly-fire. |
|
Linear
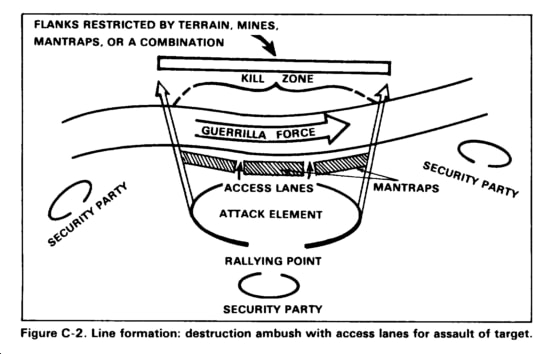
A linear ambush is the most basic type. In it, all ambushing forces are arrayed in a single line. This type of ambush is easy to set up in a hurry and works well in most situations. Many hasty ambushes end up as linear ambushes due to lack of time and mobility to get an L-shaped ambush enacted. Note that the longer the line is, the harder it is for the enemy to find cover or concealment - features that may conceal him from one end of the line may not have an effect due to a member on the other end being able to still see him. Note also that the ambushing team should not be spread so thin that the ambushees are able to assault into the ambush and drive a wedge through the line.
|
'L' shaped
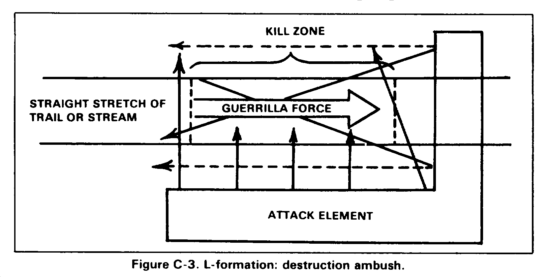
An L-shaped ambush is a bit more complex to pull off, but the extra effort is rewarded by markedly increased effectiveness. An L-shaped ambush requires that one element be positioned at a right-angle to the rest of the ambush. When the ambush is initiated, one of the two elements will find itself firing into the flanks of the enemy, while the other element will be firing into its front. Being hit from two sides like this will rapidly attrit the enemy and make it almost impossible for them to survive. A well-conducted L-shaped ambush is near certain death for those trapped in the kill zone.
L-Shaped ambushes can be done with any composition of forces. Even a single infantryman who is off to the side of the enemy when they come under fire from the front can have a dramatic effect. Initiating fires from the front while a sniper or designated marksman lurks quietly off to the enemy's flank can be highly effective - the enemy will find cover or concealment that protects them from the front, leaving their flanks open to the sniper or designated marksman who can then pick them off at will. |
|
Hasty
Hasty ambushes are usually against enemy infantry but can also be against other enemy forces. The decision to conduct a hasty ambush needs to be communicated rapidly, since there usually isn't much time to get positioned and ready to open fire. Fireteam leaders and squad leaders are the most common leaders to give orders for a hasty ambush. Satchel charges and other explosives play a very limited role in these types of ambushes due to the lack of time and ability to position them
|
Deliberate
These are typically convoy ambushes. You may be tasked in a mission to stake out a slice of terrain and cover roads that an enemy convoy is expected to pass. In such a situation, demolition plays a large part. Mines can be set, as can satchel charges and other explosive devices. A relatively large amount of prep time is given for this, and the results tend to reflect this. Deliberate ambushes are devastating and highly effective. The one big unknown is whether the expected enemy force will be the same composition and size as our mission briefing or intelligence reported. The difference between a troop convoy and a tank convoy, for instance, is huge, and both must be engaged with different tactical considerations.
|
|
Area
|
Point
|
|
An area ambush consists of multiple related killzones, usually on multiple enemy formations.
|
A point ambush, whether independent or part of an area ambush, is positioned along the expected route of approach of the guerrilla force. Formation is important because, to a great extent, it determines whether a point ambush can deliver the heavy volume of highly concentrated fire necessary to isolate, trap, and destroy the guerrillas.
|
Infantry Tasks
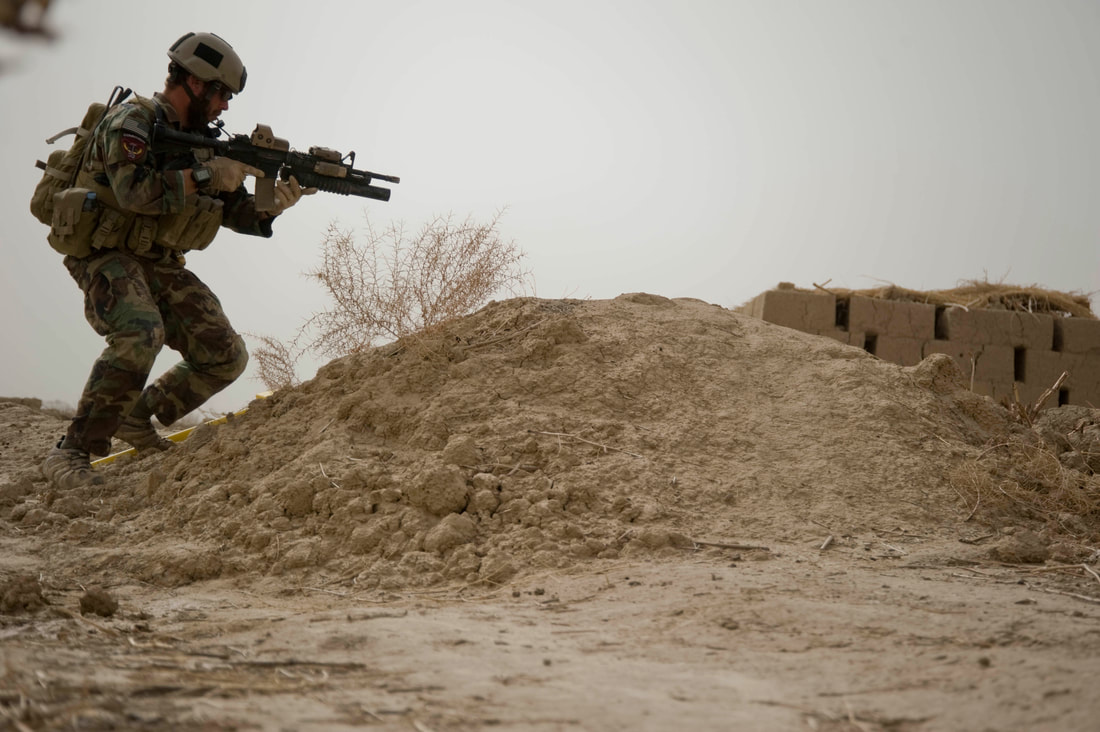
1. Movement to Contact:
• Search and Attack
• Approach-March
2. Attack Forms (Special Purpose):
3. Exploitation
4. Pursuit
• Search and Attack
• Approach-March
2. Attack Forms (Special Purpose):
3. Exploitation
4. Pursuit
Movement to Contact
Movement to contact is a type of offensive operation designed to develop the situation and establish or regain contact. A commander conducts this type of offensive operation when the tactical situation is not clear or when the enemy has broken contact. A properly executed movement to contact develops the combat situation and maintains the commander's freedom of action after contact is gained. This flexibility is essential in maintaining the initiative.
Purposeful and aggressive movement, decentralized control, and the hasty deployment of combined arms formations from the march to attack or defend characterize the movement to contact. The fundamentals of a movement to contact are--
• Focus all efforts on finding the enemy.
• Make initial contact with the smallest force possible, consistent with protecting the force.
• Make initial contact with small, mobile, self-contained forces to avoid decisive engagement of the main body on ground chosen by the enemy. This allows the commander maximum flexibility to develop the situation.
• Task-organize the force and use movement formations to deploy and attack rapidly in any direction.
• Keep forces within supporting distances to facilitate a flexible response.
• Maintain contact regardless of the course of action (COA) adopted once contact is gained.
• Close air support, air interdiction, and counterair operations are essential to the success of large-scale movements to contact (MTCs). Local air superiority or, as a minimum, air parity is vital to the operation's success.
Improved intelligence, surveillance, and reconnaissance (ISR) capabilities reduce the need for large elements to conduct an MTC since fully modernized units normally have a general idea of the location of significant enemy forces. However, enemy use of complex terrain and offensive information operations designed to degrade the accuracy of the friendly common operational picture will continue to require small tactical units to conduct an MTC.
A meeting engagement is a combat action that occurs when a moving force engages an enemy at an unexpected time and place. Conducting an MTC results in a meeting engagement. The enemy force may be either stationary or moving. Such encounters often occur in small-unit operations when reconnaissance has been ineffective. The force that reacts first to the unexpected contact generally gains an advantage over its opponent. However, a meeting engagement may also occur when the opponents are aware of each other and both decide to attack immediately to obtain a tactical advantage or seize key or decisive terrain. A meeting engagement may also occur when one force attempts to deploy into a hasty defense while the other force attacks before its opponent can organize an effective defense. Acquisition systems may discover the enemy before the security force can gain contact. No matter how the force makes contact, seizing the initiative is the overriding imperative. Prompt execution of battle drills at platoon level and below, and standard actions on contact for larger units can give that initiative to the friendly force.
Search and Attack
Search and attack is a technique for conducting a movement to contact that shares many of the characteristics of an area security mission. A commander employs this form of a movement to contact, conducted primarily by light forces and often supported by heavy forces, when the enemy is operating as small, dispersed elements, or when the task is to deny the enemy the ability to move within a given area. The battalion is the echelon that normally conducts a search and attack. A brigade will assist its subordinate battalions by ensuring the availability of indirect fires and other support.
The commander task organizes his unit into reconnaissance, fixing, and finishing forces, each with a specific purpose and task. The size of the reconnaissance force is based on the available intelligence about the size of enemy forces in the AO. The less known about the situation, the larger the reconnaissance force. The reconnaissance force typically consists of scout, infantry, aviation, and electronic warfare assets. The fixing force must have enough combat power to isolate the enemy once the reconnaissance force finds him. The finishing force must have enough combat power to defeat those enemy forces expected to be located within the AO. The commander can direct each subordinate unit to retain a finishing force, or he can retain the finishing force at his echelon. The commander may rotate his subordinate elements through the reconnaissance, fixing, and finishing roles. However, rotating roles may require a change in task organization and additional time for training and rehearsal.
The commander establishes control measures that allow for decentralized actions and small-unit initiative to the greatest extent possible. The minimum control measures for a search and attack are an AO, target reference points (TRPs), objectives, checkpoints, and contact points. (See Figure 4-5.) The use of TRPs facilitates responsive fire support once the reconnaissance force makes contact with the enemy. The commander uses objectives and checkpoints to guide the movement of subordinate elements. Coordination points indicate a specific location for coordinating fires and movement between adjacent units. The commander uses other control measures, such as phase lines, as necessary. (See Chapters 2 and 3 for definitions of available control measures.)
A commander conducts a search and attack for one or more of the following purposes:
• Destroy the enemy: render enemy units in the AO combat-ineffective.
• Deny the area: prevent the enemy from operating unhindered in a given area; for example, in any area he is using for a base camp or for logistics support.
• Protect the force: prevent the enemy from massing to disrupt or destroy friendly military or civilian operations, equipment, property, and key facilities.
• Collect information: gain information about the enemy and the terrain to confirm the enemy COA predicted as a result of the intelligence preparation of the battlefield process.
• The products of the intelligence preparation of the battlefield process are critical to conducting a search and attack. They focus the force's reconnaissance efforts on likely enemy locations.
The search and attack plan places the finishing force, as the decisive operation, where it can best maneuver to destroy enemy forces or essential facilities once located by reconnaissance assets. Typically, the finishing force occupies a central location in the AO. However, the factors of METT-TC may allow the commander to position the finishing force outside the search and attack area. The commander weights this decisive operation by using priority of fires and assigning priorities of support to his other available combat multipliers, such as engineer elements and helicopter lift support. The commander establishes control measures as necessary to consolidate units and concentrate the combat power of the force before the attack. Once the reconnaissance force locates the enemy, the fixing and finishing forces can fix and destroy him. The commander also develops a contingency plan in the event that the reconnaissance force is compromised.
Approach-March
The approach march advances a combat unit when direct contact with the enemy is intended. It can be performed dismounted, mounted, or a combination of the two. The concept behind the approach march as a technique for movement to contact is to make contact with the smallest enemy element. When executed effectively it allows the commander the flexibility of maneuvering or bypassing the enemy force. During an approach march, the company commander will organize his unit into two elements (advance guard, and main body). As part of a company using the approach march technique, units may act as the advance guard, the flank or rear guard, or may receive on-order missions as part of the main body.
Advance Guard
The advance guard operates forward of the main body to ensure its uninterrupted advance. It protects the main body from surprise attack and fixes the enemy to protect the deployment of the main body. As the advance guard, the unit finds the enemy and locates gaps, flanks, and weaknesses in his defense. The advance guard attempts to make contact on ground of its own choosing, to gain the advantage of surprise, and to develop the situation (either fight through or support the assault of all or part of the main body). The advance guard operates within the range of indirect fire support weapons. The unit uses appropriate formations and movement techniques based on the factors of METT-TC.
The advance guard is normally the most robust of the security elements. In addition to the general security measures described above, the advance guard and its sub elements--
• Preserve the main body’s freedom of maneuver.
• Prevent unnecessary delay in movement of the main body.
• Learn the whereabouts of the enemy.
• Develop intelligence about the terrain and the environment.
• Detect and overcome enemy security measures.
• Identify and disrupt enemy attempts to ambush the main body.
• Must be ready to gain fire superiority and fight any enemy forces encountered.
• Watch the enemy (if direct fire contact is not pending).
• Delay any enemy attacks to gain time for the main body to deploy.
Main Body
When moving as part of the main body units may be tasked to assault, bypass, or fix an enemy force; or to seize, secure, or clear an assigned area. The unit also may be detailed to provide squads as flank or rear guards, stay-behind ambushes, or additional security to the front. Platoons and squads use appropriate formations and movement, assault, and ambush techniques.
The main body moves to reinforce any success achieved by the advance guard, flank the enemy position, or apply overwhelming combat power to seize the contested area. During the attack, the leader on the field takes care to isolate the objective by positioning the flank guard to prevent interdiction of enemy reinforcements into the engagement. The positioning of flank guard blocking positions must be far enough away from the area that no enemy weapons can bring fires to effect the attack by the main body.
Flank or Rear Guard
The unit will have the responsibilities of flank or rear guard when moving within the company main body. However, the unit may act as the flank or rear guard for a battalion conducting a movement to contact using approach march technique. In either situation, the unit--
• Moves using the appropriate formation and movement technique. (It must maintain the same momentum as the main body.)
• Provides early warning.
• Destroys enemy reconnaissance units.
• Prevents direct fires or observation of the main body.
Attack Forms (Special Purpose)
1. Raid
2. Counterattack
3. Spoiling Attack
4. Feint
5. Demonstration
2. Counterattack
3. Spoiling Attack
4. Feint
5. Demonstration
1. Raid
A raid is a limited-objective form of an attack, usually small-scale, involving swift penetration of hostile territory to secure information, confuse the enemy, or destroy installations. A raid always ends with a planned withdrawal to a friendly location upon completion of the mission. A unit can conduct an independent raid in support of the battalion or higher headquarters operation, or it can participate as part of the company in a series of raids. Squads typically do not execute raids; they participate in platoon raids.
A unit may conduct a raid to accomplish a number of missions, including the following:
• Capture prisoners.
• Destroy specific command, control, and or communications locations.
• Destroy logistical areas.
• Obtain information concerning enemy locations, dispositions, strengths, intentions, or methods of operation.
• Confuse the enemy or disrupt his plans.
• Seize contraband.
The task organization of the raiding element is determined by the purpose of the operation. However, the raiding force normally consists of the following elements:
• Support element (support by fire).
• Assault element (with the essential task of the mission).
• Breach element (if required to reduce enemy obstacles).
• Isolation/security element.
The main differences between a raid and other special purpose attacks are the limited objectives of the raid and the associated withdrawal following completion. However, the sequence of unit actions for a raid is very similar to those for an ambush. Additionally, the assault element of the unit may have to conduct a breach of a protective obstacle (if a breach element has not been designated). Raids may be conducted in daylight or darkness, within or beyond the supporting distances of the parent unit. When the enemy location to be raided is beyond supporting distances of friendly lines, the raiding party operates as a separate element. An objective, usually very specific in nature, is assigned to orient the raiding unit (Figure 7-9). During the withdrawal, the attacking element should use a route different from that used to conduct the raid itself.
2. Counterattack
The counterattack is a form of attack by part or all of a friendly defending element against an enemy attacking force. The general objective of a counterattack is to deny the enemy his goal of attacking. This attack by defensive elements regains the initiative or denies the enemy success with his attack. The unit may conduct a counterattack as a lightly committed element within a company or as the battalion reserve. Counterattacks afford the friendly defender the opportunity to create favorable conditions for the commitment of combat power. The unit counterattacks after the enemy begins his attack, reveals his main effort, or creates an assailable flank. As part of a higher headquarters, the unit conducts the counterattack much like other attacks. However, the unit leader must synchronize the execution of his counterattack within the overall defensive effort. The unit should rehearse the counterattack and prepare the ground to be traversed, paying close attention to friendly unit locations, obstacles, and engagement areas.
3. Spoiling Attack
A spoiling attack is a form of attack that preempts or seriously impairs an enemy attack while the enemy is in the process of planning or preparing to attack. The purpose of a spoiling attack is to disrupt the enemy’s offensive capabilities and timelines, destroy his personnel and equipment, and gain additional time for the defending element to prepare positions. The purpose is not to secure terrain or other physical objectives. A commander (company or battalion) may direct a unit to conduct a spoiling attack during friendly defensive preparations to strike the enemy while he is in assembly areas or attack positions where he is preparing offensive operations. The unit leader plans for a spoiling attack as he does for other attacks.
4. Feint
A feint is a form of attack used to deceive the enemy as to the location and time of the actual operation. Feints attempt to induce the enemy to move reserves and shift his fire support to locations where they cannot immediately impact the actual operation. When directed to conduct a feint, the unit seeks direct fire or contact with the enemy, but avoids decisive engagement. The commander (company or battalion) will assign the unit an objective limited in size or scope. The planning, preparation, and execution considerations are the same as for other forms of attack. The enemy must be convinced that the feint is the actual attack.
5. Demonstration
A demonstration is a form of attack designed to deceive the enemy as to the location or time of the actual operation by a display of force. Demonstrations attempt to deceive the enemy and induce him to move reserves and shift his fire support to locations where they cannot immediately impact the actual operation. When directed to conduct a demonstration, the unit does not seek to make contact with the enemy. The planning, preparation, and execution considerations are the same as for other forms of attack. It must appear to be an actual impending attack.
Exploitation
An exploitation often follows a successful attack to take advantage of a weakened or collapsed enemy. The purpose of exploitation can vary, but it generally focuses on capitalizing on a temporary advantage or preventing the enemy from establishing an organized defense or conducting an orderly withdrawal. To accomplish this, a small unit (or higher level unit) attacks rapidly over a broad front to prevent the enemy from establishing a defense, organizing an effective rear guard, withdrawing, or regaining balance. The unit secures objectives, severs escape routes, and destroys all enemy forces. Failure to exploit success aggressively gives the enemy time to reconstitute an effective defense or regain the initiative by a counterattack.
The conditions for exploitation develop very quickly. Often the lead unit in contact identifies the collapse of the enemy's resistance. The unit commander must receive accurate assessments and reports of the enemy situation to capitalize on the opportunity for exploitation. Typical indications of the conditions for exploitation include--
• A significant increase in EPWs.
• An increase in abandoned enemy equipment and materiel.
• The overrunning of enemy artillery, C2 facilities, and logistics sites.
• A significant decrease in enemy resistance or in organized fires and maneuver.
• An intermixing of support and combat vehicles in formations and columns.
• An increase in enemy rearward movement, especially of reserves and fire support units.
Should a unit conduct exploitation as part of a larger operation, it may have the mission to seize a terrain-oriented objective. In this case, the unit avoids decisive engagement and moves to the objective as quickly as possible. If assigned a force-oriented objective, the unit seeks and destroys enemy forces anywhere within its AO. The exploitation ends when the enemy reestablishes its defense, all organized enemy resistance breaks down, or the friendly force culminates logistically or physically.
Pursuit
A unit does not conduct a pursuit as an independent action. Even at higher levels, the risks associated with a pursuit operation generally outweigh the benefits. However, if provided aviation assets or additional ground maneuver units, the unit can conduct a pursuit. If so, the unit can serve as the direct-pressure force or the encircling force.
A pursuit is ordered when the enemy can no longer maintain a coherent position and tries to escape. Once ordered, combined operations planning between the pressure and encircling forces is critical for the necessary synchronization. The units mission is the destruction of the enemy rather than avoiding enemy contact.
The direct-pressure force organizes for a movement to contact and prepares to conduct a series of hasty attacks. Encirclement results when a force is able to sever the enemy's lines of communication and prevent his reinforcement or escape. The encircling force must have greater mobility than the enemy. The encircling force is usually created from uncommitted forces and must be strong enough to protect itself from the enemy's reserves and what is left of the main body. The direct-pressure force must track the movement of and coordinate with the encircling force. Timing is key to success of the mission, and information systems are key to this synchronization. The encircling force should be prepared to conduct a hasty defense until the direct-pressure force succeeds in destroying or forcing the enemy to surrender. The ultimate goal of a pursuit is to fix the enemy between the direct-pressure force and the encircling force and then to destroy the enemy.
Infantry Forms of Maneuver
1. Envelopment
2. Turning Movement
3. Infiltration
4. Penetration.
5. Frontal Attack
2. Turning Movement
3. Infiltration
4. Penetration.
5. Frontal Attack
Envelopment
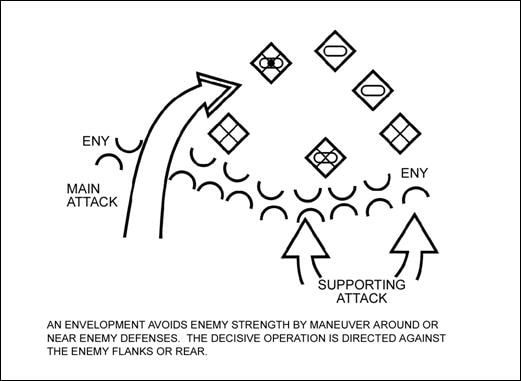
Envelopment is a form of maneuver in which an attacking element seeks to avoid the principal enemy defenses by seizing objectives to the enemy flank or rear in order to destroy him in his current positions. Flank attacks are a variant of envelopment in which access to the enemy’s flank and rear results in enemy destruction or encirclement. A successful envelopment requires discovery or creation of an assailable flank. The envelopment is the preferred form of maneuver because the attacking element tends to suffer fewer casualties while having the most opportunities to destroy the enemy. A unit may conduct the envelopment by itself or as part of the company’s attack. Envelopments focus on--
• Seizing terrain.
• Destroying specific enemy forces.
• Interdicting enemy withdrawal routes.
• Seizing terrain.
• Destroying specific enemy forces.
• Interdicting enemy withdrawal routes.
Turning Movement
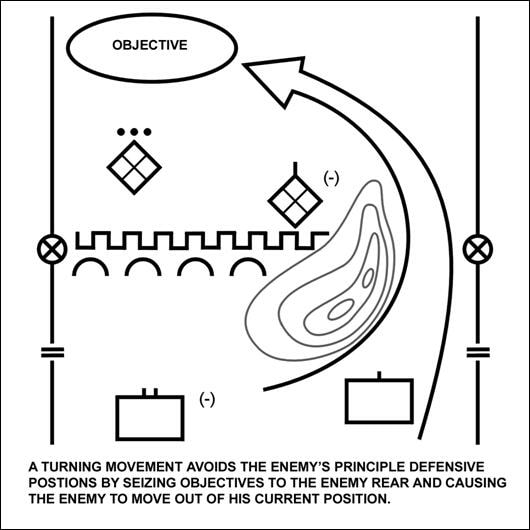
The turning movement is a form of maneuver in which the attacking element seeks to avoid the enemy’s principal defensive positions by seizing objectives to the enemy’s rear. This causes the enemy to move out of his current positions or to divert major forces to meet the threat. For a turning movement to be successful, the unit trying to turn the enemy must attack something the enemy will fight to save or that will cause him to move to avoid destruction. This may be a supply route, an artillery emplacement, or a headquarters. In addition to attacking a target that the enemy will fight to save, the attacking unit should be strong enough to pose a real threat. A unit will likely conduct a turning movement as part of a company supporting a battalion attack.
NOTE: The turning movement is different from envelopment because the element conducting the turning movement seeks to make the enemy displace from his current location. An enveloping element seeks to engage the enemy in his current location from an unexpected direction.
NOTE: The turning movement is different from envelopment because the element conducting the turning movement seeks to make the enemy displace from his current location. An enveloping element seeks to engage the enemy in his current location from an unexpected direction.
Infiltration
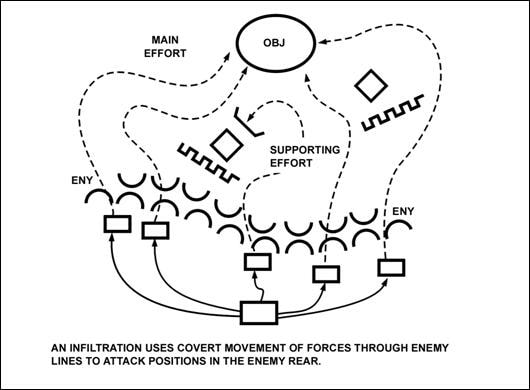
Infiltration is a form of maneuver in which an attacking element conducts undetected movement through or into an area occupied by enemy forces to gain a position of advantage in the enemy rear. When conducted efficiently only small elements will be exposed to enemy defensive fires. Moving and assembling forces covertly through enemy positions takes a considerable amount of time. A successful infiltration reaches the enemy’s rear without fighting through prepared positions. An infiltration is normally used in conjunction with and in support of a unit conducting another form of maneuver. A unit may conduct an infiltration as part of a larger unit’s attack with the company employing another form of maneuver. A unit may conduct an infiltration to--
• Attack enemy-held positions from an unexpected direction.
• Occupy a support-by-fire position to support an attack.
• Secure key terrain.
• Conduct ambushes and raids.
• Conduct a covert breach of an obstacle.
• Attack enemy-held positions from an unexpected direction.
• Occupy a support-by-fire position to support an attack.
• Secure key terrain.
• Conduct ambushes and raids.
• Conduct a covert breach of an obstacle.
Penetration
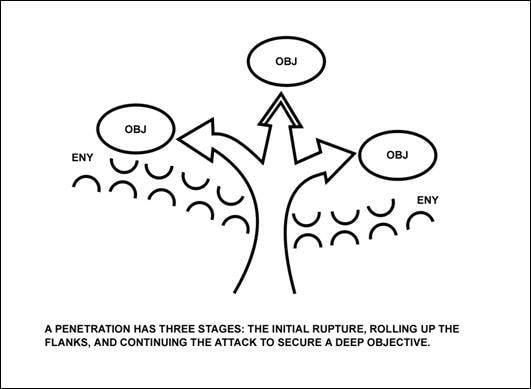
Penetration is a form of maneuver in which an attacking element seeks to rupture enemy defenses on a narrow front to create both assailable flanks and access to the enemy’s rear. Penetration is used when enemy flanks are not assailable; when enemy defenses are overextended; when weak spots in the enemy defense are identified; and when time does not permit some other form of maneuver. A penetration normally consists of three steps: breach the enemy’s main defense positions, widen the gap created to secure flanks by enveloping one or both of the newly exposed flanks, and seize the objective. As part of a larger force penetration the unit will normally isolate, suppress, fix, or destroy enemy forces; breach tactical or protective obstacles in the enemy’s main defense; secure the shoulders of the penetration; or seize key terrain. Similar to breaching obstacles, the unit will be designated as a breach, support, or assault element. A company may also use the penetration to secure a foothold within a built-up area.
Frontal Attack
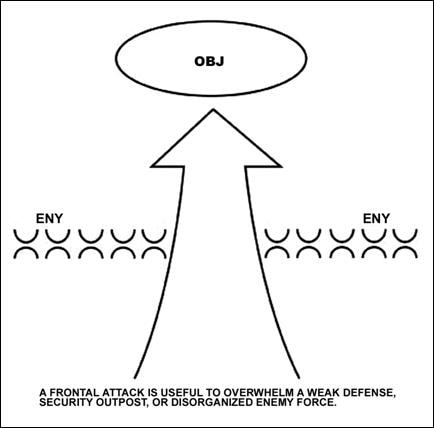
Frontal attack is a form of maneuver in which an attacking element seeks to destroy a weaker enemy force or fix a larger enemy force along a broad front. It is the least desirable form of maneuver because it exposes the attacker to the concentrated fire of the defender and limits the effectiveness of the attacker’s own fires. However, the frontal attack is often the best form of maneuver for an attack in which speed and simplicity are key. It is useful in overwhelming weak defenses, security outposts, or disorganized enemy forces, and is also often used when a unit conducts a reconnaissance in force.
Infantry Offensive Tactical Tasks
1. Seize
2. Clear
3. Suppress.
4. Support by Fire
5. Attack by Fire
2. Clear
3. Suppress.
4. Support by Fire
5. Attack by Fire
Seize
Seizing involves gaining possession of a designated objective by overwhelming force. Seizing an objective is complex. It involves closure with the enemy, under fire of the enemy’s weapons to the point that the friendly assaulting element gains positional advantage over, destroys, or forces the withdrawal of the enemy.
A unit may seize prepared or unprepared enemy positions from either an offensive or defensive posture. Examples include the following:
• A unit seizes the far side of an obstacle as part of a company breach or seizes a building to establish a foothold in an urban environment.
• A unit seizes a portion of an enemy defense as part of a company deliberate attack.
• A unit seizes key terrain to prevent its use by the enemy.
There are many inherent dangers in seizing an objective. They include the requirement to execute an assault, prepared enemy fires, a rapidly changing tactical environment, and the possibility of fratricide when friendly elements converge. These factors require the unit leader and subordinate leaders to understand the following planning considerations.
Developing a clear and current picture of the enemy situation is very important. The unit may seize an objective in a variety of situations, and the unit leader will often face unique challenges in collecting and disseminating information on the situation. For example, if the unit is the seizing element during a company deliberate attack, the unit leader should be able to develop an accurate picture of the enemy situation during the planning and preparation for the operation. He must be prepared to issue modifications to the unit as new intelligence comes in or as problems are identified in rehearsals.
In another scenario, the unit leader may have to develop his picture of the enemy situation during execution. He must rely more heavily on reports from units in contact with the enemy and on his own development of the situation. In this type of situation, such as when the unit is seizing an enemy combat security outpost during a movement to contact, the unit leader must plan on relaying information as it develops. He uses clear, concise FRAGOs to explain the enemy situation, and give clear directives to subordinates.
Clear
Clearing requires the unit to remove all enemy forces and eliminate organized resistance within an assigned area. The unit may be tasked with clearing an objective area during an attack to facilitate the movement of the remainder of the company, or may be assigned clearance of a specific part of a larger objective area. Infantry units are normally best suited to conduct clearance operations, which in many cases will involve working in restrictive terrain. Situations in which the unit may conduct the clearance tactical task include clearing a--
• Defile, including choke points in the defile and high ground surrounding it.
• Heavily wooded area.
• Built-up or strip area.
• Road, trail, or other narrow corridor, which may include obstacles or other obstructions on the actual roadway and in surrounding wooded and built-up areas.
General Terrain Considerations
The unit leader must consider several important terrain factors when planning and executing the clearance task. Observation and fields of fire may favor the enemy. To be successful, the friendly attacking element must neutralize this advantage by identifying dead spaces where the enemy cannot see or engage friendly elements. It should also identify multiple friendly support-by-fire positions that are necessary to support a complex scheme of maneuver which cover the unit’s approach, the actual clearance task, and friendly maneuver beyond the restrictive terrain.
When clearing in support of tactical vehicles, cover and concealment are normally abundant for Infantry elements, but scarce for trail-bound vehicles. Lack of cover leaves vehicles vulnerable to enemy antiarmor fires. While clearing in support of mechanized vehicles, obstacles influence the maneuver of vehicles entering the objective area. The narrow corridors, trails, or roads associated with restrictive terrain can be easily obstructed with wire, mines, and log cribs.
Key terrain may include areas dominating the objective area, approaches, or exits, and any terrain dominating the area inside the defile, wooded area, or built-up area. Avenues of approach will be limited. The unit must consider the impact of canalization and estimate how much time will be required to clear the objective area.
Restrictive Terrain Considerations
Conducting clearance in restrictive terrain is both time consuming and resource intensive. During the planning process, the unit leader evaluates the tactical requirements, resources, and other considerations for each operation.
During the approach, the unit leader focuses on moving combat power into the restrictive terrain and posturing it to start clearing the terrain. The approach ends when the subordinate units complete their preparations to conduct an attack. The unit leader--
• Establishes support-by-fire positions.
• Destroys or suppresses any known enemy positions to allow elements to approach the restrictive terrain.
• Provides more security by incorporating suppressive indirect fires and obscuring or screening smoke.
The unit leader provides support by fire for his subordinate units. He prepares to support his subordinate units where they enter the restrictive terrain by using--
• High ground on either side of a defile.
• Wooded areas on either side of a trail or road.
• Buildings on either side of a road in a built-up area.
• Movement of subordinate units along axes to provide cover and concealment.
Clearance begins as the subordinate units begin their attack in and around the restrictive terrain. Examples of where this maneuver may take place include--
• Both sides of a defile, either along the ridgelines or high along the walls of the defile.
• Along the wood lines parallel to a road or trail.
• Around and between buildings on either side of the roadway in a built-up area.
The following apply during clearance:
• Subordinate units (typically squads) provide a base of fire to allow the weapons or support-by-fire element to bound to a new support-by-fire position. This cycle continues until the entire area is cleared.
• Direct-fire plans should cover responsibility for horizontal and vertical observation, and direct fire.
• Subordinate units should clear a defile from the top down and should be oriented on objectives on the far side of the defile.
• Engineers with manual breaching capability should move with the subordinate units. Engineers may also be needed in the overwatching element to reduce obstacles.
At times, the unit may encounter terrain that restricts or severely restricts movement. Movement through these areas is vulnerable to ambush and road blocks. Clearance techniques can also be loosely applied to other terrain features. Bridges, city streets, road bends, corridors, thickly wooded areas, and any other area where a narrow passage wall has severely restrictive terrain on both sides may need clearing when advancing in the fight.
The unit must secure the far side of the defile, built-up area, or wooded area until the company moves forward to pick up the fight beyond the restrictive terrain. If the restrictive area is large, the unit may be directed to assist the passage of another element forward to continue the clearance operation. The unit must be prepared to--
• Destroy enemy forces.
• Secure the far side of the restrictive terrain.
• Maneuver subordinate units to establish support-by-fire positions on the far side of the restrictive terrain.
• Support by fire to protect the deployment of the follow-on force assuming the fight.
• Suppress any enemy elements that threaten the company while it exits the restrictive terrain.
• Disrupt enemy counterattacks.
• Protect the obstacle reduction effort.
• Maintain observation beyond the restrictive terrain.
• Integrate indirect fires as necessary.
Enemy Analysis
Careful analysis of the enemy situation is necessary to ensure the success of clearing. The enemy evaluation should include the following:
• Enemy vehicle location, key weapons, and Infantry elements in the area of operations.
• Type and locations of enemy reserve forces.
• Type and locations of enemy OPs.
• The impact of the enemy’s CBRN and or artillery capabilities.
Belowground Operations
Belowground operations involve clearing enemy trenches, tunnels, caves, basements, and bunker complexes. The unit’s base-of-fire element and maneuvering elements must maintain close coordination. The weapons elements or support-by-fire element focuses on protecting the subordinate units as they clear the trench line, or maneuver to destroy individual or vehicle positions. The base-of-fire element normally concentrates on destroying key surface structures (especially command posts and crew-served weapons bunkers) and the suppression and destruction of enemy vehicles.
The unit must establish a base of fire to allow the subordinate units to then maneuver or enter the trench line, tunnel, basement, or bunker. The direct-fire plan must be thoroughly developed and rehearsed to ensure it will facilitate effective protection for the Infantry while preventing fratricide.
The unit leader must also consider specific hazards associated with the unit or supporting weapons systems. An example is the downrange hazard for the subordinate units created by the missile system platforms.
The unit should consider using restrictive fire measures to protect converging friendly elements. It must also use other direct-fire control measures such as visual signals to trigger the requirement to lift, shift, or cease direct fires. Techniques for controlling direct fires during trench, tunnel, basement, and bunker clearance may include the following: attaching a flag to a pole carried by the trooper who follows immediately behind the lead clearing team; using panels to mark cleared bunkers, tunnels, and basements; using visual signals to indicate when to lift, shift, or cease fires.
Once the subordinate units enter the belowground area, the combined effects of the unit’s assets place the enemy in a dilemma. Every action the enemy takes to avoid direct fire from the support-by-fire element, such as maintaining defilade positions or abandoning bunker complexes, leaves him vulnerable to attack from the subordinate units maneuvering down the trench. Every time the enemy moves his vehicles to avoid attacking elements, or when his Infantry elements stay in bunkers or command posts, he exposes himself to support fires.
Consolidation consists of securing the objective and defending against an enemy counterattack.
Reorganization, normally conducted concurrently with consolidation, consists of preparing for follow-on operations. As with consolidation, the unit leader must plan and prepare for reorganization as he conducts his leading procedures. He ensures the unit is prepared to--
• Provide essential medical treatment and evacuate casualties as necessary.
• Cross-level personnel and adjust task organization as required.
• Conduct resupply operations, including rearming and refueling.
• Redistribute ammunition.
• Conduct required maintenance.
Suppress
The unit maneuvers to a position on the battlefield where it can observe the enemy and engage him with direct and indirect fires. The purpose of suppressing is to prevent the enemy from effectively engaging friendly elements with direct or indirect fires. To accomplish this, the unit must maintain orientation both on the enemy force and on the friendly maneuver element it is supporting. During planning and preparation, the unit leader should consider--
• Conducting a line-of-sight analysis during his terrain analysis to identify the most advantageous positions from which to suppress the enemy.
• Planning and integrating direct and indirect fires.
• Determining control measures (triggers) for lifting, shifting, or ceasing direct fires.
• Determining control measures for shifting or ceasing indirect fires.
• Planning and rehearsing actions on contact.
• Planning for large Class V expenditures. (The higher commander and the unit leader must consider a number of factors in assessing Class V requirements including the desired effects of the unit direct fires; the composition, disposition, and strength of the enemy force; and the time required to suppress the enemy.)
• Determining when and how the unit will reload ammunition during the fight while still maintaining suppression for the assaulting element.
Support By Fire
The unit maneuvers to a position on the battlefield from where it can observe the enemy and engage him with direct and indirect fires. The purpose of support by fire is to prevent the enemy from engaging friendly elements.
To accomplish this task, the unit must maintain orientation both on the enemy force and on the friendly maneuver element it is supporting. The unit leader should plan and prepare by--
• Conducting line-of-sight analysis to identify the most advantageous support-by-fire positions.
• Conducting planning and integration for direct and indirect fires.
• Determining triggers for lifting, shifting, or ceasing direct and indirect fires.
• Planning and rehearsing actions on contact.
• Planning for large Class V expenditures, especially for the weapons and support elements, because they must calculate rounds per minute. (The unit leader and weapons leader must consider a number of factors in assessing Class V requirements, including the desired effects of unit fires; the time required for suppressing the enemy; and the composition, disposition, and strength of the enemy force.)
A comprehensive understanding of the battlefield and enemy and friendly disposition is a crucial factor in all support-by-fire operations. The unit leader uses all available intelligence and information resources to stay abreast of events on the battlefield. Additional considerations may apply. The unit may have to execute an attack to secure the terrain from where it will conduct the support by fire. The initial support-by-fire position may not afford adequate security or may not allow the unit to achieve its intended purpose. This could force the unit to reposition to maintain the desired weapons effects on the enemy. The unit leader must ensure the unit adheres to these guidelines:
• Maintain communication with the moving element.
• Be prepared to support the moving element with both direct and indirect fires.
• Be ready to lift, shift, or cease fires when masked by the moving element.
• Scan the area of operations and prepare to acquire and destroy any enemy element that threatens the moving element.
• Maintain 360-degree security.
• Use heavy weapon systems to destroy any exposed enemy vehicles.
• Employ subordinate units to lay a base of sustained fire to keep the enemy fixed or suppressed in his fighting positions.
• Prevent the enemy from employing accurate direct fires against the protected force.
Attack by Fire
The unit maneuvers to a position on the battlefield from where it can observe the enemy and engage him with direct and indirect fires at a distance to destroy or weaken his maneuvers. The unit destroys the enemy or prevents him from repositioning. The unit employs long-range fires from dominating terrain. It also uses flanking fires or takes advantage of the standoff range of the unit’s weapons systems. The company commander may designate an attack-by-fire position from where the unit will fix the enemy. An attack-by-fire position is most commonly employed when the mission or tactical situation focuses on destruction or prevention of enemy movement. In the offense, it is usually executed by supporting elements. During defensive operations, it is often a counterattack option for the reserve element.
When the unit is assigned an attack-by-fire position, the unit leader obtains the most current intelligence update on the enemy and applies his analysis to the information. During planning and preparation, the unit leader should consider--
• Conducting a line-of-sight analysis during terrain analysis to identify the most favorable locations to destroy or fix the enemy.
• Conducting direct and indirect fire planning and integration.
• Determining control measures (triggers) for lifting, shifting, or ceasing direct fires.
• Determining control measures for shifting or ceasing indirect fires.
• Planning and rehearsing actions on contact.
Several other considerations may affect the successful execution of an attack by fire. The unit may be required to conduct an attack against enemy security forces to seize the ground from where it will establish the attack-by-fire position. The initial attack-by-fire position may afford inadequate security or may not allow the unit to achieve its task or purpose. This could force the unit to reposition to maintain the desired weapons effects on the enemy force. Because an attack by fire may be conducted well beyond the direct fire range of other units, it may not allow the unit to destroy the targeted enemy force from its initial positions. The unit may begin to fix the enemy at extended ranges. Additional maneuver would then be required to close with the enemy force and complete its destruction. Throughout an attack by fire, the unit should reposition or maneuver to maintain flexibility, increase survivability, and maintain desired weapons effects on the enemy. Subordinate unit support functions may include:
• Seizing the attack-by-fire position before occupation by mounted sections.
• Providing local security for the attack-by-fire position.
• Executing timely, decisive actions on contact.
• Using maneuver to move to and occupy attack-by-fire positions.
• Destroying enemy security elements protecting the targeted force.
• Employing effective direct and indirect fires to disrupt, fix, or destroy the enemy force.
Common Offensive Control Measures
Assembly Area (AA)
Where troops gather to prepare for operations
Assault Position
A covered/concealed position short of the objective from which final preparations are made to assault the objective
Assault Time
Establishes the moment to attack the objective.
Attack by Fire Position
Uses direct/indirect fires to engage an enemy without closing in on him with an assault element
Attack Position
Last position an attacking force occupies or passes through before crossing the LD (Line of Departure)
Engagement Area (EA)
Where you believe the bulk of the fighting will take place.
Limit of Advance (LOA)
Predetermined physical limit of advancing troops while on the objective.
Line of Departure (LD)
Where troops leave for the beginning of the mission
Phase Line (PL)
A graphic/terrain based location to use as a reference in coordinating activities
Rules of Engagement (ROE)
The when and how a servicemember can use force
Target Reference Point (TRP)
A terrain based feature that is used to help coordinate direct/indirect fire
INFANTRY TECHNIQUES
Infantry Patrol Types
Combat
A combat patrol provides security and harasses, destroys, or captures enemy troops, equipment, or installations. When the commander gives a unit the mission to send out a combat patrol, he intends for the patrol to make contact with the enemy and engage in close combat. A combat patrol always attempts to remain undetected while moving, but of course it ultimately discloses its location to the enemy in a sudden, violent surprise attack. For this reason, the patrol normally carries a significant amount of weapons and ammunition. It may carry specialized munitions. A combat patrol collects and reports any information gathered during the mission, whether related to the combat task or not. The three types of combat patrols are raid, ambush, and security.
Raid
A raid is a surprise attack against a position or installation for a specific purpose other than seizing and holding the terrain. It is conducted to destroy a position or installation, to destroy or capture enemy troops or equipment, or to free prisoners. A raid patrol retains terrain just long enough to accomplish the intent of the raid. A raid always ends with a planned withdrawal off the objective and a return to the main body.
Ambush
An ambush is a surprise attack from a concealed position on a moving or temporarily halted target. An ambush patrol does not need to seize or hold any terrain. It can include an assault to close with and destroy the target, or an attack by fire only.
Security
A security patrol is sent out from a unit location when the unit is stationary or during a halt to search the local area, detect any enemy forces near the main body, and to engage and destroy the enemy within the capability of the patrol. This type of combat patrol is normally sent out by units operating in close terrain with limited fields of observation and fire. Although this type of combat patrol seeks to make direct enemy contact and to destroy enemy forces within its capability, it should try to avoid decisive engagement. A security patrol detects and disrupts enemy forces that are conducting reconnaissance of the main body or that are massing to conduct an attack. Security patrols are normally away from the main body of the unit for limited periods, returning frequently to coordinate and rest. They do not operate beyond the range of communications and supporting fires from the main body, especially mortar fires.
Reconnaissance
A reconnaissance patrol collects information to confirm or disprove the accuracy of information previously gained. The intent for this type of patrol is to move stealthily, avoid enemy contact, and accomplish its tactical task without engaging in close combat. With one exception (presence patrols), reconnaissance patrols always try to accomplish their mission without being detected or observed. Because detection cannot always be avoided, a reconnaissance patrol carries the necessary arms and equipment to protect itself and break contact with the enemy. A reconnaissance patrol normally travels light, with as few personnel, arms, ammunition, and equipment as possible. This increases stealth and cross‑country mobility in close terrain. Regardless of how the patrol is armed and equipped, the leader always plans for the worst case: direct-fire contact with a hostile force. Leaders must anticipate where they may possibly be observed and control the hazard by emplacing measures to lessen their risk. If detected or unanticipated opportunities arise, reconnaissance patrols must be able to rapidly transition to combat. Types of reconnaissance patrols follow:
Area Reconnaissance Patrol
The area reconnaissance patrol focuses only on obtaining detailed information about the terrain or enemy activity within a prescribed area.
Route Reconnaissance Patrol
The route reconnaissance patrol obtains detailed information about a specified route and any terrain where the enemy could influence movement along that route.
Zone Reconnaissance Patrol
Zone reconnaissance patrols involve a directed effort to obtain detailed information on all routes, obstacles, terrain, and enemy forces within a zone defined by boundaries.
Point Reconnaissance Patrol
The point reconnaissance patrol goes straight to a specific location and determines the situation there. As soon as it does so, it either reports the information by radio or returns to the larger unit to report. This patrol can obtain, verify, confirm, or deny extremely specific information for the commander. These patrols are often used in stability or civil support operations. Normally, the patrol leader is the individual responsible for making the assigned assessment. This may involve interacting with the local populace. To allow this, interpreters or local civil leaders might accompany the patrol. The patrol leader may be required to participate in lengthy discussions or inspections with individuals at the site. During that time he is vulnerable to attack. The assistant patrol leader should not become involved in these talks, but should remain focused on external security to prevent attack from outside and on the personal security of the patrol leader. One or two specially-designated members of the patrol may be needed to protect the patrol leader while his attention is focused on discussions.
Leader’s Reconnaissance Patrol
The leader’s reconnaissance patrol reconnoiters the objective just before an attack or prior to sending elements forward to locations where they will support by fire. It confirms the condition of the objective, gives each subordinate leader a clear picture of the terrain where he will move, and identifies any part of the objective he must seize or suppress. The leader’s reconnaissance patrol can consist of the unit commander or representative, the leaders of major subordinate elements, and (sometimes) security personnel and unit guides. It gets back to the main body as quickly as possible. The commander can use the five‑point contingency:
G Going—where is the leader going?
O Others—what others are going with him?
T Time (duration)—how long will the leader be gone?
W What do we do if the leader fails to return?
A Actions—what actions do the departing reconnaissance
element and main body plan to take on contact?
Contact Patrol
A contact patrol is a special reconnaissance patrol sent from one unit to physically contact and coordinate with another. Modern technology has reduced, but not eliminated, the need for contact patrols. They are most often used today when a U.S. force must contact a non‑U.S. coalition partner who lacks compatible communications or position‑reporting equipment. Contact patrols may either go to the other unit’s position, or the units can meet at a designated contact point. The leader of a contact patrol provides the other unit with information about the location, situation, and intentions of his own unit. He obtains and reports the same information about the contacted unit back to his own unit. The contact patrol also observes and reports pertinent information about the area between the two units.
Presence Patrols
A presence patrol is used in stability or civil support operations. It has many purposes, but should always see and be seen, but seen in a specific manner determined by the commander. Its primary goal is to gather information about the conditions in the unit’s AO. To do this, the patrol gathers critical (as determined by the commander) information, both specific and general. The patrol seeks out this information, and then observes and reports. Its secondary role is to be seen as a tangible representation of the U.S. military force, projecting an image that furthers the accomplishment of the commander’s intent.
In addition to reconnaissance tasks, presence patrols demonstrate to the local populace the presence and intent of the U.S. forces. Presence patrols are intended to clearly demonstrate the determination, competency, confidence, concern, and when appropriate, the overwhelming power of the force to all who observe it, including local and national media.
The commander always plans for the possibility that a presence patrol may make enemy contact, even though that is not his intent. Rarely should a commander use a presence patrol where enemy contact is likely. Presence patrols work best for some types of stability operations such as peace operations, humanitarian and civic assistance, non-combatant evacuations, or shows of force. Before sending out a presence patrol, the commander should carefully consider what message he wants to convey, and then clearly describe his intent to the patrol leader.
To accomplish the “to be seen” part of its purpose, a presence patrol reconnoiters overtly. It takes deliberate steps to visibly reinforce the impression the commander wants to convey to the populace. Where the patrol goes, what it does there, how it handles its weapons, what equipment and vehicles it uses, and how it interacts with the populace are all part of that impression. When the presence patrol returns to the main body, the commander thoroughly debriefs it; not only for hard information, but also for the patrol leader’s impressions of the effects of the patrol on the populace. This allows the commander to see to modify the actions of subsequent patrols.
Tracking Patrol
A tracking patrol is normally a squad‑size, possibly smaller, element. It is tasked to follow the trail of a specific enemy unit in order to determine its composition, final destination, and actions en route. Members of the patrol look for subtle signs left by the enemy as he moves. As they track, they gather information about the enemy unit, the route it took, and the surrounding terrain. Normally, a tracking patrol avoids direct fire contact with the tracked unit, but not always. Tracking patrols often use tracker dog teams to help them maintain the track.
Infantry Patrol Organization
A patrol is organized to perform specific tasks. It must be prepared to secure itself, navigate accurately, identify and cross danger areas, and reconnoiter the patrol objective. If it is a combat patrol, it must be prepared to breach obstacles, assault the objective, and support those assaults by fire. Additionally, a patrol must be able to conduct detailed searches as well as deal with casualties and prisoners or detainees.
The leader identifies those tasks the patrol must perform and decides which elements will implement them. Where possible, he should maintain squad and fire team integrity.
Squads and fire teams may perform more than one task during the time a patrol is away from the main body or it may be responsible for only one task. The leader must plan carefully to ensure that he has identified and assigned all required tasks in the most efficient way.
Elements and teams for platoons conducing patrols include the common and specific elements for each type of patrol. The following elements are common to all patrols.
Command Team
The headquarters element normally consists of the patrol leader and his radio operator. The unit sergeant may be designated as the assistant unit leader. Combat patrols may include a forward observer and perhaps his radio operator. Any attachments the unit leader decides that he or the unit sergeant must control directly are also part of the headquarters element.
Pointman/Dragman/Security
Security is everyone’s responsibility. Every patrol has a troop walking in front. This troop is called the pointman. He is responsible for making sure the patrol does not walk into enemy ambushes, minefields, or similar. The pointman has forward security. Sometimes a patrol will send the pointman with another patrol member to walk a short distance forward of the patrol.
Also, every patrol has someone who is last in the formation. This troop is called the dragman. He is responsible for making sure that no patrol members are left behind. He also makes sure that the enemy doesn’t surprise the patrol from the rear unnoticed.
The security team is responsible for specifically pulling security to the left and right of the patrol. This is a critical task when crossing danger areas, so a specific team is identified to conduct this task.
Compass/Pace
If the patrol does not have access to global positioning systems, or if it is operating in a location where there is no satellite reception, it may be necessary to navigate by dead reckoning. This is done with a compass man and a pace man. Typically the compass and pace team is positioned immediately behind the pointman. Additionally, a secondary compass and pace team is usually located in the back half of the patrol.
Aid and Litter Teams
There are usually two members of each fire team designated as aid and litter teams. These teams are spread throughout the patrol and have the responsibility of carrying and employing extra medical aid gear. Aid and litter teams are ultimately responsible for locating, treating, and evacuating casualties.
Detainee Teams
EPW teams are responsible for controlling enemy prisoners IAW the five S’s and the leader’s guidance. These teams may also be responsible for accounting for and controlling detainees or recovered personnel.
Clearing Teams
The clearing team crosses the danger area once the security team is in place. The clearing team has the specified responsibility of visually clearing and physically securing the far side of a danger area. It’s important so another team is designated to conduct this task.
Specialty/Tracking Teams
There are many different specialty teams that might be assigned to a patrol. Trackers are one such resource. Explosive ordinance details are another. Trackers are unique, however, because they are generally positioned just ahead of the pointman on the patrol.
Support Teams
The support team is outfitted with heavy, crew-served weapons on the patrol. Of course, reconnaissance patrols usually do not make use of a support team. But when a support team is required, it will be positioned to the center of the patrol. Combat patrols generally designate support teams to provide direct fire in support of the breach and assault teams.
Assault Teams
Combat patrols designate assault teams to close with the enemy on the objective or to clear the ambush kill zone.The assault team may be dispersed throughout the patrol, but ideally is situated toward the rear. This is because the assault team is typically placed on the objective last. Reconnaissance rarely ever needs an assault team.
Breach & Search Teams
Combat patrols have breach teams to assist the assault team in getting to the objective. Search teams are designated to conduct a cursory or detailed search of the objective area.
Surveillance Teams
Surveillance teams are used to establish and maintain covert observation of an objective for as long as it takes to complete the patrol’s mission.
En Route Recorder
An en route recorder can be designated to record all information collected during the mission.
Unit Survivability
1. Forward Operating Base
2. Observation Post
3. Checkpoints
• Deliberate
• Hasty
• Snap
• TCP (Traffic Control Point)
4. Search
5. Patrol
6. Convoy
7. Secure MSR/ASR
2. Observation Post
3. Checkpoints
• Deliberate
• Hasty
• Snap
• TCP (Traffic Control Point)
4. Search
5. Patrol
6. Convoy
7. Secure MSR/ASR
1. Forward Operating Base (FOB)
A forward operating base (FOB) is any secured forward operational level military position, commonly a military base, that is used to support strategic goals and tactical objectives. A FOB may or may not contain an airfield, hospital, machine shop, or other logistical facilities. The base may be used for an extended period of time. FOBs are traditionally supported by Main Operating Bases that are required to provide backup support to them. A FOB also improves reaction time to local areas as opposed to having all troops on the main operating base.
In its most basic form, a FOB consists of a ring of barbed wire around a position with a fortified entry control point, or ECP. More advanced FOBs include an assembly of berms, concrete barriers, gates, watchtowers, bunkers and other force protection infrastructure. They are often built from Hesco bastions.
A forward operating base (FOB) is:
• Used to achieve operational goals at the tactical level
• Primarily used for defensive operations
• From where offensive operations can take place
Important goals of defensive operations include:
• Protecting key terrain/vital infrastructure
• Stopping Enemy suppliy routes into the AO
• Gaining local intelligence on Enemy activity
• FOBs are supported by Main Operating Bases that are required to provide backup support to them
The smallest unit that can operate/manage a FOB is a Platoon
FOB Manning requirements:
• 1 SQD needs to be on guard duty
• 1 SQD needed for QRF
• 1 SQD mission/patrolling
• 1 SQD on recovery
At the Special Operations level, the smallest unit is an AFO with conventional/Host Nation personnel for security duties
A FOB needs:
• An HLZ (Helicopter Landing Zone)
• Medical services (Level II)
• A QRF for base security
• Indirect capabilities (mortars)
• Within friendly artilery/CAS range
• An outer/inner perimeter
• Defendable
• Able to conduct offensive operations
3 Phases of FOB building:
• Initial
• Temporary
• Permanent
2. Observation Posts
An observation post (commonly abbreviated OP), temporary or fixed, is a position from which personnel can watch enemy movements, to warn of approaching personnel (such as in trench warfare), or to direct artillery fire. In strict military terminology, an observation post is any preselected position from which observations are to be made - this may include very temporary installations such as a vehicle parked as a roadside checkpoint, or even an airborne aircraft.
When selecting a (temporary) observation post, trained troops are to avoid obvious and conspicuous locations such as hilltops, water towers or other isolated terrain features, and to ensure that the observation post can be reached via a concealed route. This is especially important as the observer in the post should be rotated every 20–30 minutes, as vigilance decreases markedly after such a time.
Observation posts should be manned with at least two personnel (more, for defense and observer rotation, if the post is to be retained for longer durations), and should be provided a means of communication with their chain of command, preferably by phone instead of by radio.
Often being positioned in secret very close to the enemy, an observation post is usually a small construct, often consisting largely of camouflage materials and possibly weather cover. However, where frontlines are expected to be stable for a longer time, an observation post (or ground observation post) may develop into a bunker-like installation.
It is not unusual for troops to occupy a 'hide' for long periods of time. To avoid detection they have to remove all their own waste, this is achieved with the aid of clingfilm, plastic bags and empty water bottles.
3. Checkpoints
Checkpoints are manned locations employed within conflict-ridden areas all over the world to monitor and control the movement of people and materials in order to limit violence.
Checkpoints are used to accomplish the following:
Checkpoints provide many advantages, including the ability to control how people enter so that security personnel (be it governmental or civilian) can screen entrants to identify known troublemakers (be they criminals, terrorists, or simple rabble-rousers) and locate contraband items.
There are two types of checkpoints, permanent and temporary. Permanent checkpoints are established on a major route to stop, screen and search traffic as necessary. Permanent checkpoints utilize concrete structures and electrically or manually operated barriers. They would also have some sort of permanent overhead cover that provides lighting and protective strong points.
A temporary checkpoint would be established to monitor or control flow utilizing limited resources. They should be able to be dismantled and moved as necessary.
Deliberate Checkpoint
The deliberate checkpoint is a relatively fixed position established in a town or in open country, often on a main road. Deliberate checkpoints are classified to handle either heavy traffic or light traffic, based on the amount of traffic expected to pass through them. Scout sections and squads can operate only light traffic checkpoints. The scout platoon can operate both heavy and light traffic checkpoints. A deliberate checkpoint would require available engineer resources to help build the checkpoint; these resources can be constructed or dismantled in a few hours. A deliberate checkpoint would present a more difficult challenge for vehicles to crash through and requires 4-5 troops to man it. A deliberate checkpoint is not as flexibile as a snap checkpoint and the personnel manning a deliberate checkpoint would be susceptible to ambush.
Establishing a deliberate checkpoint. The physical layout and level of preparation of the checkpoint depend on the amount of traffic expected to pass through it and the duration of its operation. Regardless of the type, all checkpoints have common characteristics and organization. A checkpoint consists of the following parts:
• Obstacles (barriers).
• Search areas.
• Security overwatch and fighting positions.
• Holding area.
Obstacles.
A checkpoint is established by placing two parallel obstacles (each with a gap) across the road. These obstacles should be large enough and deep enough to prevent vehicles from running over or through them. The gap must be negotiable by slow-moving vehicles only. The distance between obstacles depends on the amount of traffic that is held in the search area. A barrier pole is placed midway between obstacles to control movement from the search area to the exit obstacle.
Search areas.
The amount of traffic held in the search areas is determined by the type of search. Separate search areas for the following should be set up as needed:
• Vehicles.
• Females.
• Other individuals.
These include suspects and other persons detained for further interrogation.
• Fighting positions.
Fighting positions for vehicles, automatic weapons, and individuals must be emplaced to overwatch, protect, and secure the checkpoint.
• Holding area.
A holding area is established several hundred meters forward of the checkpoint to control the flow of traffic so that the checkpoint is not overwhelmed.
• Task organization.
Personnel manning the checkpoint are organized into the following teams or elements to accomplish specific tasks:
Headquarters element:
• Security force.
• Search teams.
• Sentry teams.
Headquarters element. The headquarters element consists of the platoon leader, PSG, or section leader; an RTO; and medical personnel.
Security force. The security force consists of a security element and a checkpoint reaction force.
The checkpoint security element mans overwatch positions and/or perimeter security positions. Security element personnel maintain overwatch of activities in the search area and provide security for personnel operating the checkpoint. Overwatch positions also provide security for sentry teams and the holding area.
The checkpoint reaction force is a concealed element whose purpose is to prevent traffic from avoiding or bypassing the checkpoint. This force can be part of the perimeter security and can react to surprise attacks against the checkpoint or to other emergency situations. It can be located at a position away from the checkpoint, but it must be able to quickly move to the checkpoint to provide necessary support. The reaction force should be no smaller than a scout section.
Search teams.
The search team, comprising two to three personnel, searches vehicles and personnel. The team is organized into a guard security element and a search element. The guard element provides security during the searches; at least one member of the guard element guards or observes the individuals or vehicles being searched at all times while the searcher conducts the search.
Sentry teams.
Sentry teams secure the entrance and exit of the checkpoint and the holding area. They control the flow of traffic through the checkpoint, including movement from the entrance into the search area and from the search area to the exit point.
Other personnel.
Whenever possible, the following should be on hand to assist scout platoon personnel with checkpoint activities:
• A civil affairs officer, a liaison officer, or a member of the civilian police or other local authority.
• An interpreter.
• A trained female searcher.
Hasty Checkpoint
Hasty checkpoints are set up to achieve surprise. They are established in locations where they cannot be observed by approaching traffic until it is too late to withdraw and escape without being observed. Possible locations for hasty checkpoints include the following:
The hasty checkpoint has the same basic layout as a deliberate checkpoint; however, because hasty checkpoints are temporary and mobile, the platoon or section establishing the checkpoint must carry the materials necessary to construct it.
A platoon or section typically uses its vehicles, reinforced with concertina wire, as the obstacle. The vehicles are positioned to partially block the road or route. The search area is the space between the vehicles. Sentries are positioned at each end of the checkpoint and are covered by mounted or dismounted automatic weapon positions. A reaction force is designated and concealed nearby
Snap Checkpoint
A snap checkpoint is mobile and can be quickly established and relocated. The equipment repaired is minimal and easily transported by vehicles. A snap checkpoint is not be a challenge for heavy vehicles to blow through or crash though.
Traffic Control Point
A traffic control point is a designated spot on the ground or road network--in a static garrison type environment--where Military Police control the traffic flow.
The three goals in point control of traffic are orderly movement of traffic in accordance with traffic control plans, no unnecessary traffic delays and minimum essential control methods. These goals should be accomplished with maximum use of traffic control devices, relieving MPs of this duty when possible.
Traffic control points should be used in the following situations:
• Road network is inadequate to accommodate traffic.
• Serious delays or congestion occur or are anticipated.
• Traffic studies indicate a particular need for control.
• Security of designated persons requires special control.
• Interruptions of traffic flow are reported to Military Police.
• A location becomes unsafe.
Checkpoints are used to accomplish the following:
- Control movement along specific routes.
- Maintain continuous monitoring of road movement.
- Apprehend suspects.
- Prevent smuggling of controlled items.
- Prevent infiltration of unauthorized civilians or military forces into or through a controlled area.
- Check vehicles and personnel for weapons, ammunition, and explosives.
- Ensure proper use of routes by civilian and military traffic.
Checkpoints provide many advantages, including the ability to control how people enter so that security personnel (be it governmental or civilian) can screen entrants to identify known troublemakers (be they criminals, terrorists, or simple rabble-rousers) and locate contraband items.
There are two types of checkpoints, permanent and temporary. Permanent checkpoints are established on a major route to stop, screen and search traffic as necessary. Permanent checkpoints utilize concrete structures and electrically or manually operated barriers. They would also have some sort of permanent overhead cover that provides lighting and protective strong points.
A temporary checkpoint would be established to monitor or control flow utilizing limited resources. They should be able to be dismantled and moved as necessary.
Deliberate Checkpoint
The deliberate checkpoint is a relatively fixed position established in a town or in open country, often on a main road. Deliberate checkpoints are classified to handle either heavy traffic or light traffic, based on the amount of traffic expected to pass through them. Scout sections and squads can operate only light traffic checkpoints. The scout platoon can operate both heavy and light traffic checkpoints. A deliberate checkpoint would require available engineer resources to help build the checkpoint; these resources can be constructed or dismantled in a few hours. A deliberate checkpoint would present a more difficult challenge for vehicles to crash through and requires 4-5 troops to man it. A deliberate checkpoint is not as flexibile as a snap checkpoint and the personnel manning a deliberate checkpoint would be susceptible to ambush.
Establishing a deliberate checkpoint. The physical layout and level of preparation of the checkpoint depend on the amount of traffic expected to pass through it and the duration of its operation. Regardless of the type, all checkpoints have common characteristics and organization. A checkpoint consists of the following parts:
• Obstacles (barriers).
• Search areas.
• Security overwatch and fighting positions.
• Holding area.
Obstacles.
A checkpoint is established by placing two parallel obstacles (each with a gap) across the road. These obstacles should be large enough and deep enough to prevent vehicles from running over or through them. The gap must be negotiable by slow-moving vehicles only. The distance between obstacles depends on the amount of traffic that is held in the search area. A barrier pole is placed midway between obstacles to control movement from the search area to the exit obstacle.
Search areas.
The amount of traffic held in the search areas is determined by the type of search. Separate search areas for the following should be set up as needed:
• Vehicles.
• Females.
• Other individuals.
These include suspects and other persons detained for further interrogation.
• Fighting positions.
Fighting positions for vehicles, automatic weapons, and individuals must be emplaced to overwatch, protect, and secure the checkpoint.
• Holding area.
A holding area is established several hundred meters forward of the checkpoint to control the flow of traffic so that the checkpoint is not overwhelmed.
• Task organization.
Personnel manning the checkpoint are organized into the following teams or elements to accomplish specific tasks:
Headquarters element:
• Security force.
• Search teams.
• Sentry teams.
Headquarters element. The headquarters element consists of the platoon leader, PSG, or section leader; an RTO; and medical personnel.
Security force. The security force consists of a security element and a checkpoint reaction force.
The checkpoint security element mans overwatch positions and/or perimeter security positions. Security element personnel maintain overwatch of activities in the search area and provide security for personnel operating the checkpoint. Overwatch positions also provide security for sentry teams and the holding area.
The checkpoint reaction force is a concealed element whose purpose is to prevent traffic from avoiding or bypassing the checkpoint. This force can be part of the perimeter security and can react to surprise attacks against the checkpoint or to other emergency situations. It can be located at a position away from the checkpoint, but it must be able to quickly move to the checkpoint to provide necessary support. The reaction force should be no smaller than a scout section.
Search teams.
The search team, comprising two to three personnel, searches vehicles and personnel. The team is organized into a guard security element and a search element. The guard element provides security during the searches; at least one member of the guard element guards or observes the individuals or vehicles being searched at all times while the searcher conducts the search.
Sentry teams.
Sentry teams secure the entrance and exit of the checkpoint and the holding area. They control the flow of traffic through the checkpoint, including movement from the entrance into the search area and from the search area to the exit point.
Other personnel.
Whenever possible, the following should be on hand to assist scout platoon personnel with checkpoint activities:
• A civil affairs officer, a liaison officer, or a member of the civilian police or other local authority.
• An interpreter.
• A trained female searcher.
Hasty Checkpoint
Hasty checkpoints are set up to achieve surprise. They are established in locations where they cannot be observed by approaching traffic until it is too late to withdraw and escape without being observed. Possible locations for hasty checkpoints include the following:
- Tunnels and large culverts.
- Bridges.
- Defiles.
- Positions beyond sharp curves.
- Highway intersections.
- Key terrain on highways.
- Reverse slopes of hills.
- Other locations that limit detection from long distances.
The hasty checkpoint has the same basic layout as a deliberate checkpoint; however, because hasty checkpoints are temporary and mobile, the platoon or section establishing the checkpoint must carry the materials necessary to construct it.
A platoon or section typically uses its vehicles, reinforced with concertina wire, as the obstacle. The vehicles are positioned to partially block the road or route. The search area is the space between the vehicles. Sentries are positioned at each end of the checkpoint and are covered by mounted or dismounted automatic weapon positions. A reaction force is designated and concealed nearby
Snap Checkpoint
A snap checkpoint is mobile and can be quickly established and relocated. The equipment repaired is minimal and easily transported by vehicles. A snap checkpoint is not be a challenge for heavy vehicles to blow through or crash though.
Traffic Control Point
A traffic control point is a designated spot on the ground or road network--in a static garrison type environment--where Military Police control the traffic flow.
The three goals in point control of traffic are orderly movement of traffic in accordance with traffic control plans, no unnecessary traffic delays and minimum essential control methods. These goals should be accomplished with maximum use of traffic control devices, relieving MPs of this duty when possible.
Traffic control points should be used in the following situations:
• Road network is inadequate to accommodate traffic.
• Serious delays or congestion occur or are anticipated.
• Traffic studies indicate a particular need for control.
• Security of designated persons requires special control.
• Interruptions of traffic flow are reported to Military Police.
• A location becomes unsafe.
4. Search
Cordon and search is a military tactic to cordon off an area and search the premises for weapons or insurgents. It is one of the basic counter insurgency operations. Two types of cordon and search operations are cordon and knock and cordon and kick (or cordon and enter).
In a cordon and knock operation, counterinsurgency forces assemble around an area to provide security ("cordon") and then obtain permission to search the area from residents ("knock"). The occupants may be asked to leave buildings prior to the search, to avoid physical contact and conflict between the search party and the building occupants. This is called a tactical callout. A cordon and ask operation involves the assistance of local authorities. If permission is denied but the residents are thought to be friendly or neutral, counterinsurgency force leaders may decide not to search an area.
A cordon and kick or cordon and enter operation is more forceful than cordon and knock. It is performed without obtaining permission of the occupants. It may be done because permission is not given for a cordon and knock operation; however, if resistance is expected, a cordon and kick operation may be planned from the start. The type of force used to enter the building may range from simply opening a door to using explosives.
Cordon and knock is a relatively new technique in military operations. It has taken over the old term of a simple house search. It is part of new doctrine called Stability and Support Operations or SASO. It is a technique used where there is no hard intelligence of weapons in the house and therefore is less intense than a normal house search. It is used in urban neighborhoods. The purpose of the mission is to search a house with as little inconvenience to the resident family as possible.
5. Patrol
A patrol is a sub-subunit or small tactical formation, sent out from a military organization by land, sea or air for the purpose of combat, reconnaissance, or a combination of both. The basic task of a patrol is to follow a known route with the purpose of investigating some feature of interest or, in the assignment of a fighting patrol (US combat patrol), to find and engage the enemy. A patrol can also mean a small cavalry or armored unit, subordinate to a troop or platoon, usually comprising a section or squad of mounted troopers, or two AFVs (often tanks).
Patrolling is also a form of power projection, expanding the presence of a military force in its region.
Patrolling is a military tactic. Small groups or individual units are deployed from a larger formation to achieve a specific objective and then return. The tactic of patrolling may be applied to ground troops, armored units, naval units, and combat aircraft. The duration of a patrol will vary from a few hours to several weeks depending on the nature of the objective and the type of units involved.
There are several different types of patrol each with a different objective. The most common is to collect information by carrying out a reconnaissance patrol. Such a patrol may try to remain clandestine and observe an enemy without themselves being detected. Other reconnaissance patrols are overt, especially those that interact with the civilian population.
A combat patrol is a group with sufficient size (usually platoon or company) and resources to raid or ambush a specific enemy. It primarily differs from an attack in that the aim is not to hold ground.
A clearing patrol is a brief patrol around a newly occupied defensive position in order to ensure that the immediate area is secure. Clearing patrols are often undertaken on the occupation of a location, and during stand to in the transition from night to day routine and vice versa.
A standing patrol is a static patrol, probably known as an OP/LP(Observation Post/Listening post) in US and NATO terminology. Standing patrols are usually small (half section/section) static patrols intended to provide early warning, security or to guard some geographical feature, such as dead ground.
A reconnaissance (recce) patrol is a patrol, usually small whose main mission is the gathering of information. Generally speaking recce patrols tend to avoid contact, although it is not unknown for recon patrols to "fight for information".
A screening patrol combines a number of patrols to 'screen' a large area. This type of patrol is used by armored formations in desert theaters, and also by ground troops operating in urban areas. A screen is generally composed of a number of static observation posts.
6. Convoy
A convoy is a group of vehicles, typically motor vehicles or ships, traveling together for mutual support and protection. Often, a convoy is organized with armed defensive support. It may also be used in a non-military sense, for example when driving through remote areas. Arriving at the scene of a major emergency with a well-ordered unit and intact command structure can be another motivation.
7. Supply Route
A supply route (MSR/ASR) is a route or routes designated within an area of operations upon which traffic flows in support of military operations and humanitarian operations. Supply Route is a term that is also used in insurgency and irregular war scenarios. A Main Supply Route is designated as the primary route/routes for traffic to move through whereas a Alternate or Secondary Supply Route is typically denoted for small, less open roads for the purposes of discretion.
Because of the intense and predictable flow of constrained military traffic MSRs can often become targets for opposing forces, as was the case with the Airport Road in Baghdad, a short but dangerous route. ASR/SSRs are generally more favorable for discrete & lesser known movement.
Because of the intense and predictable flow of constrained military traffic MSRs can often become targets for opposing forces, as was the case with the Airport Road in Baghdad, a short but dangerous route. ASR/SSRs are generally more favorable for discrete & lesser known movement.
Types of Reconnaissance
1. Zone
2. Area
3. Route
4. In Force
5. Recon By Fire
2. Area
3. Route
4. In Force
5. Recon By Fire
Methods
1. Fan
2. Box
3. Converging Route
4. Successive Sector
1. Fan
2. Box
3. Converging Route
4. Successive Sector
1. Zone
Zone reconnaissance is a form of reconnaissance that involves a directed effort to obtain detailed information on all routes, obstacles, terrain, and enemy forces within a zone defined by boundaries. Obstacles include both existing and reinforcing, as well as areas with NBC contamination. The commander assigns a zone reconnaissance mission when he needs additional information on a zone before committing other forces in the zone. It is appropriate when the enemy situation is vague, existing knowledge of the terrain is limited, or combat operations have altered the terrain. A zone reconnaissance may include several route or area reconnaissance missions assigned to subordinate units.
A zone reconnaissance is normally a deliberate, time-consuming process. It takes more time than any other reconnaissance mission, so the commander must allow adequate time to conduct it. A zone reconnaissance is normally conducted over an extended distance. It requires all ground elements executing the zone reconnaissance to be employed abreast of each other. However, when the reconnaissance objective is the enemy force, a commander may forgo a detailed reconnaissance of the zone and focus his assets on those named areas of interest (NAI) that would reveal enemy dispositions and intentions. A reconnaissance unit can never disregard terrain when focusing on the enemy. However, it minimizes its terrain reconnaissance to that which may influence an NAI.
A zone reconnaissance is normally a deliberate, time-consuming process. It takes more time than any other reconnaissance mission, so the commander must allow adequate time to conduct it. A zone reconnaissance is normally conducted over an extended distance. It requires all ground elements executing the zone reconnaissance to be employed abreast of each other. However, when the reconnaissance objective is the enemy force, a commander may forgo a detailed reconnaissance of the zone and focus his assets on those named areas of interest (NAI) that would reveal enemy dispositions and intentions. A reconnaissance unit can never disregard terrain when focusing on the enemy. However, it minimizes its terrain reconnaissance to that which may influence an NAI.
2. Area
Area reconnaissance is a form of reconnaissance that focuses on obtaining detailed information about the terrain or enemy activity within a prescribed area. This area may include a town, a ridgeline, woods, an airhead, or any other feature critical to operations. The area may consist of a single point, such as a bridge or an installation. Areas are normally smaller than zones and are not usually contiguous to other friendly areas targeted for reconnaissance. Because the area is smaller, an area reconnaissance moves faster than a zone reconnaissance.
3. Route
Route reconnaissance is a form of reconnaissance that focuses along a specific line of communication, such as a road, railway, or cross-country mobility corridor. It provides new or updated information on route conditions, such as obstacles and bridge classifications, and enemy and civilian activity along the route. A route reconnaissance includes not only the route itself, but also all terrain along the route from which the enemy could influence the friendly force's movement. The commander normally assigns this mission when he wants to use a specific route for friendly movement.
4. In Force
A reconnaissance in force is a deliberate combat operation designed to discover or test the enemy's strength, dispositions, and reactions or to obtain other information. Battalion-size task forces or larger organizations usually conduct a reconnaissance in force (RIF) mission. A commander assigns a RIF mission when the enemy is known to be operating within an area and the commander cannot obtain adequate intelligence by any other means. A unit may also conduct a RIF in restrictive-type terrain where the enemy is likely to ambush smaller reconnaissance forces. A RIF is an aggressive reconnaissance, conducted as an offensive operation with clearly stated reconnaissance objectives. The overall goal of a RIF is to determine enemy weaknesses that can be exploited. It differs from other reconnaissance operations because it is normally conducted only to gain information about the enemy and not the terrain.
5. Reconnaissance by Fire
Reconnaissance by fire is a technique in which a unit fires on a suspected enemy position to cause the enemy to disclose his presence by movement or return fire. This technique is appropriate when time is critical and stealthy maneuver to further develop the situation is not possible. The fires may be either direct, indirect, or a combination. The advantage of indirect fire is that it does not give away friendly locations and usually causes the enemy to displace from the impact area. However, reconnaissance by fire may not cause a seasoned or prepared enemy force to react. Reconnaissance by fire is always characterized as aggressive.
Methods
There are four basic methods of conducting a zone reconnaissance: the fan method, box method, converging routes method, and the successive sector method. A dismounted scout unit can conduct a zone reconnaissance patrol of a narrow zone (less than 1 kilometer wide). A dismounted scout section or platoon can reconnoiter a zone up to 3 kilometers wide.
Fan Method

When using the fan method, the leader first selects a series of objective rally points (ORP) throughout the zone to operate from. The patrol establishes security at the first ORP. Upon confirming the ORP location, the leader confirms reconnaissance routes out from and back to the ORP. These routes form a fan-shaped pattern around the ORP. The routes must overlap to ensure the entire area is reconnoitered. Once the routes are confirmed, the leader sends out R&S teams along the routes. When all R&S teams have returned to the ORP, the platoon collects and disseminates all information to every warfighter before moving on to the next ORP.
Each R&S team moves from the ORP along a different fan-shaped route that overlaps with others to ensure reconnaissance of the entire area. These routes should be adjacent to each other. Adjacent routes prevent the patrol from potentially making contact in two different directions. The leader maintains a reserve at the ORP.
Each R&S team moves from the ORP along a different fan-shaped route that overlaps with others to ensure reconnaissance of the entire area. These routes should be adjacent to each other. Adjacent routes prevent the patrol from potentially making contact in two different directions. The leader maintains a reserve at the ORP.
Box Method

When using the box method, the leader sends his R&S teams from the ORP along routes that form a boxed-in area. He sends other teams along routes through the area within the box. All teams meet at a link-up point at the far side of the box from the ORP.
Converging Routes Method

When using the converging routes method, the leader selects routes from the ORP through the zone to a rendezvous point at the far side of the zone from the ORP. Each R&S team moves along a specified route and uses the fan method to reconnoiter the area between routes. The leader designates a time for all teams to link up. Once the unit arrives at the rendezvous point, it halts and establishes security.
Successive Sector Method
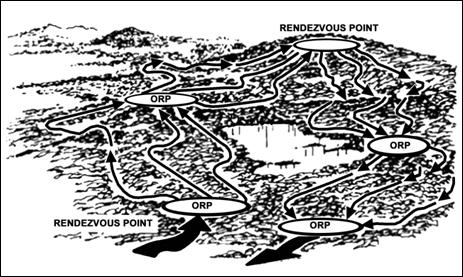
The successive sector method is a continuation of the converging routes method. The leader divides the zone into a series of sectors. The platoon uses the converging routes within each sector to reconnoiter to an intermediate link-up point where it collects and disseminates the information gathered to that point. It then reconnoiters to the next sector. Using this method, the leader selects an ORP, a series of reconnaissance routes, and linkup points. The actions from each ORP to each linkup point are the same as in the converging routes method. Each linkup point becomes the ORP for the next phase. Upon linkup at a linkup point, the leader again confirms or selects reconnaissance routes, a linkup time, and the next linkup point. This action continues until the entire zone has been reconnoitered. Once the reconnaissance is completed, the unit returns to friendly lines.
Movement
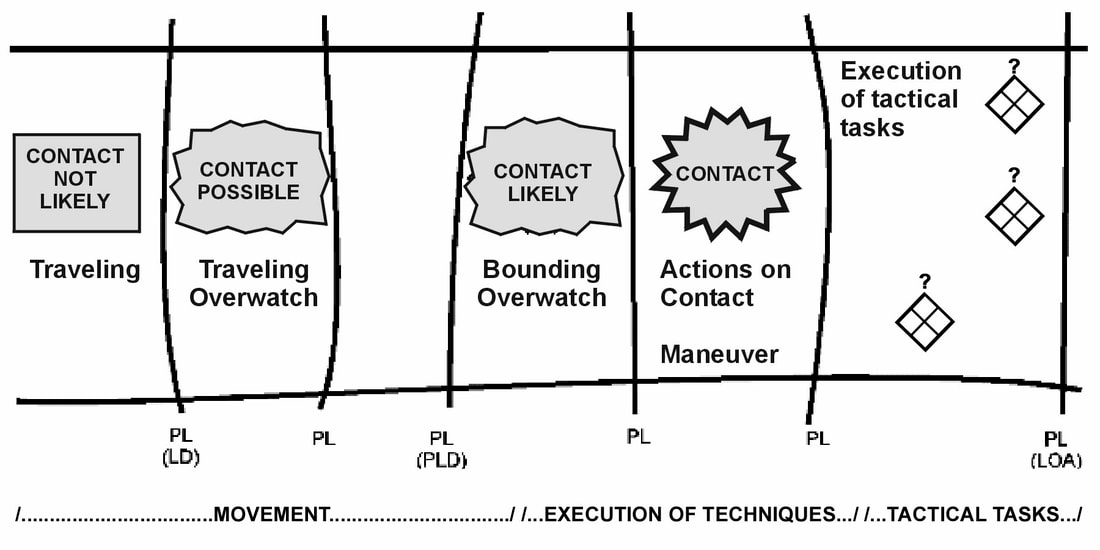
Travelling
Traveling is simply movement from point A to point B with limited security. The spacing between elements is typically small to maintain good control over the unit. Traveling movement is used when enemy contact is unlikely. Enemy contact is almost always likely, so movement in "traveling" mode is dangerous most of the time. Travelling should only be used when there is:
• Low threat
• Moving with no added security
• Low threat
• Moving with no added security
Travelling Overwatch
Traveling Overwatch is a method that simply increases the distance between elements. The extra space allows for more room to maneuver and decreases the density of friendly forces, which in turn increases the security of the unit by making it harder for an enemy to inflict large casualties via a sudden ambush or explosive trap.
When moving via traveling overwatch, particularly as in a squad or platoon line formation, one element is designated as the lead or "guide-on" element. This element controls the rate of movement or speed of advance, with other elements "guiding" off of them. If this element halts, the whole formation halts. If they move, the formation moves. This helps to ensure that the overall group formation does not overrun itself or get far out of formation. Travelling Overwatch should only be used when there is:
• Medium threat
• Moving with added interval
Bounding Overwatch
Bounding Overwatch is the de-facto "Standard Infantry Movement Technique". It is one of the most fundamental combat movement skills practiced and happens to be one of the easiest to employ as well.
The basic principle of bounding overwatch is that one element is always stationary and covering the movement of the other element(s). There are two main techniques available - alternating and successive. The choice of which one will be used depends on the threat level and the speed required. When not explicitly stated, the bounding method is determined by the second team as it begins to bound - if the threat is high, successive bounds will be employed. If not, alternating bounds will occur. Oftentimes it will become a very fluid execution that blends alternating and successive bounds as the situation requires. Being familiar with all aspects and employments of bounding overwatch allows leaders to be tactically knowledgeable enough to carry out such blended, situation-dependent employments. Bounding Overwatch should only be used when there is:
• High threat
• Moving with only 1 element at a time, while the other covers the movement
Numbers
2IC
2nd in Command
40 Mike-Mike
40mm grenade round
4-1-1
Information
Ex: "What's the 4-1-1 on Enemy Intel?"
2nd in Command
40 Mike-Mike
40mm grenade round
4-1-1
Information
Ex: "What's the 4-1-1 on Enemy Intel?"
Flight Characteristics & Terminology
Height of Flight
Low Level Flight
Low Threat
Flight reduces/avoids enemy detection & observation but is fixed in height and airspeed.
Flight reduces/avoids enemy detection & observation but is fixed in height and airspeed.
Contour Flight
Medium Threat
Flight conforms to the contour of the earth/vegetation/terrain to conceal the aircraft.
Flight conforms to the contour of the earth/vegetation/terrain to conceal the aircraft.
Nap of the Earth Flight
High Threat
Flight is as close to the earth's surface as vegetation/obstacles/terrain permits.
Flight is as close to the earth's surface as vegetation/obstacles/terrain permits.
UNIVERSAL VERBIAGE
A
A/C
Aircraft
Ex: "A/C in-bound from the East"
AO
Area of Operation
A-Team
Special Forces ODA Team
-or-
The best section of a unit
Ex: "Let's use our A-Team for this mission"
Action
Call to activity ("Action FRONT")
Active
Enemy is aware or on alert
AAA (Triple A)
Anti-Aircraft Artillery
AoO
Actions on the Objective
AGL
Above Ground Level
Alpha Roster
Alphabetical name list of an entire section/unit
As You Were
Disregard the last command
Ex: "Mount up, as you were"
ASAP
As Soon As Possible
At Ease
Relax
Ex: "At easy everyone, but listen up"
ACE
Ammunition/Casualty/Equipment
GREEN - No issues
YELLOW - Some issues
RED - Need issues to be addressed
BLACK - Cannot continue mission/task
Ex: SQD LDR: "Fireteam Alpha Team Leader, ACE Report"
TL: "ACE for Alpha team is Yellow. Ramos is hit and his radio is defunct but otherwise we are operational"
B
Balls to the Wall
As fast as possible
Ex: "Driver, return to base. Balls to the wall"
BFE (Bum Fuck Egypt)
Somewhere far away or isolated
Ex: "I had to park in BFE" or "This mission is taking us to BFE"
BFR (Big Fucking Rock)
Used to describe a large geographical terrain feature
Ex: "Enemy forces left side of the BFR"
BOLO
Be On the Look Out for
Ex: "BOLO Enemy APC of grid 1-2-3-4"
Breach
The task of breaking through or securing a passage through:
• an enemy defense, obstacle, minefield or fortification
Break, Break
Used to stop other radio chatter
Ex: "Break, break, all callsigns, Alpha 2-3 is TIC"
Bypass
When a unit deliberately maneuvers around an obstacle/position/fortification/enemy to maintain the momentum of the operation while intentional circumventing combat with an enemy force.
C
Chalk
A single lod of troops on an aircraft
Ex: "Chalk 1, board Bird 3-4"
Charlie Mike
Continue Mission
Ex: "1st OBJ secure, Charlie Mike to 2nd OBJ"
Chief
Warrant Officer/Chief Petty Officer/Helicopter Pilot/Helicopter Crew Chief
Ex: "Which bird do we load on Chief?"
Chopper
Helicopter
CHU
Containerized Housing Unit
Clear
The removal of enemy forces within an assigned area
CO
Commanding Officer
Commo
Communication Person/Equipment
COP
Combat Outpost (Platoon-level or less)
CP
Command Post (Also known as TOC)
Counter-reconnaissance
Counter enemy reconnaissance & surveillance efforts
D
Danger Area
Linear / Open or uncovered area
Danger Close
Risk that ordinance impact will injure/kill friendly forces.
Disengage
When a unit breaks contact with the enemy to allow the conduct of another mission or to avoid decisive engagement
Deuce and a Half
Cargo/Troop transport truck (6x6)
Ex: "Boys, load-up on the Deuce and 1/2"
Double Time
To do something quickly/running
Ditch
Crash land an airplane/helicopter (usually at sea)
Ex: "Haymayer Ditcing in bay SOUTH of OBJ RAKE"
Drive On
Continue task/mission
Ex: "We're short 40mm, just drive on"
Dustoff
MEDEVAC via helicopter
Ex: "Dustoff ETA 20 mikes"
DZ
Drop Zone
E
EPW
Enemy Prisoner of War
ETA
Estimated Time of Arrival
Ex: "Fast movers ETA 3 mikes"
Exfiltrate
Done when friendly forces have been encircled by enemy forces and cannot conduct a breakout or be relieved by friendly forces
Enemy Prisoner of War
ETA
Estimated Time of Arrival
Ex: "Fast movers ETA 3 mikes"
Exfiltrate
Done when friendly forces have been encircled by enemy forces and cannot conduct a breakout or be relieved by friendly forces
F
FARP
Forward Arming and Refueling Point
Fast Mover
Fixed wing aircraft
Ex "Fast movers are at IP FORD and are ready for tasking"
FP
Firing Point
Several FPs can be inside of a Battle Position (BP)
Flak
Anti-aircraft cannon fire
Ex: "ALAMO 2 is receiving flak, 100 meters north of the OBJ"
FOB
Forward Operating Base (Company or Larger)
Ex: "FOB DEXTER will be occupied by A Coy"
FLOT
Forward Line of Own Troops
Ex: "1st Plt FLOT is PL FORD"
Friendly
Friendly contact
G
Got Your "6"
I have you covered
I have you covered
H
Heads Up
Pay attention to an event
Hold Fire
Do not fire / cease fire
Hostile
Confirmed enemy
HVT
High Value Target
Pay attention to an event
Hold Fire
Do not fire / cease fire
Hostile
Confirmed enemy
HVT
High Value Target
I
IED
Improvised Explosive Device
IR
Infra Red
Improvised Explosive Device
IR
Infra Red
J
JDAM
Joint Direct Attack Munition
JTAC
Joint Terminal Attack Controller
Joint Direct Attack Munition
JTAC
Joint Terminal Attack Controller
K
KIA
Killed in Action
Killed in Action
L
LD
Line of Departure
LZ
Landing Zone
Line of Departure
LZ
Landing Zone
M
MIA
Missing in Action
MSOT
Marine Special Operations Team
MEDEVAC
Medical Evacuation (usually by helicopter)
Missing in Action
MSOT
Marine Special Operations Team
MEDEVAC
Medical Evacuation (usually by helicopter)
N
NAI
Named Area of Interest
An area where important military intelligence must be confirmed or denied.
NLT
No Lather Than
Ex: "Link up with friendlies NLT 2400hrs"
NVGs
Night Vision Goggles
Named Area of Interest
An area where important military intelligence must be confirmed or denied.
NLT
No Lather Than
Ex: "Link up with friendlies NLT 2400hrs"
NVGs
Night Vision Goggles
O
Occupy
When an area becomes under control of friendly forces and when their movement to an occupation of the area occurs without any enemy opposition.
OBJ
Objective
ODA
Operational Detachment Alpha
A Special Forces Team comprised of 12 soldiers
On the Double
To be done quickly
Ex: "Private, get here On the Double"
Oscar Mike
On the Move
Ex: "1st SQD is load and is Oscar Mike"
OPORD
Operational Order
ORP
Objective Rally Point
OP
Observation Post
P
Patrol Base
Temporary "base" (24 - 92hrs) from which a unit conducts a mission/operation
PAX/PAC (on vehicle/aircraft)
Personnel/Personnel aboard aircraft
Ex: "5 PAXs are on the first aircraft"
PL
Phase Line
Graphic control measure
PIR
Priority Intelligence Requirements
Intelligence/Information needed to fulfill a mission/task
PZ
Pick-up Zone
Usually by helicopter
R
Rally Point
Initial, en-route, objective, near/far side point of regroup
Reduce
A mobility task that involves creating sufficient 'lanes' through or around an obstacle to deny it's intended effect
Rolex +/-
Time (minutes) before/after mission start time
RP
Rendezvous Point
Ex: "If we lose contact, meet at RP WICK"
RTB
Return to Base
Ruck
Military backpack
S
Sandbox
A small terrain model to visualize for a mission
Overseas/in the desert
Secure
Preventing a unit, facility, or geographical location from being damaged or destroyed as a result of enemy action
Seize
Taking possession of a designated area/target by using overwhelming force
Shack
Small dwelling/house
Ex: "Contact! Right side of the red Shack!"
SOF
Special Operations Forces
SOP
Standard Operating Procedure
SP
Starting Point
Ex: "Convoy SP time now"
T
Tab
Walking on foot, often for a long distance and with a Ruck.
TCP (Hasty/Deliberate/Snap)
Traffic Control Point
TIC
Troops In Contact
Ex: "Alpha 2-2 is TIC, requesting CAS"
TOC
Tactical Operations Center
TRP
Target Reference Point
Walking on foot, often for a long distance and with a Ruck.
TCP (Hasty/Deliberate/Snap)
Traffic Control Point
TIC
Troops In Contact
Ex: "Alpha 2-2 is TIC, requesting CAS"
TOC
Tactical Operations Center
TRP
Target Reference Point
V
VBIED
Vehicle Borne Improvised Explosive Device
Vehicle Borne Improvised Explosive Device
W
Weapons
Weapons Control Status
FREE - At targets not identified as FRIENDLY
TIGHT - At targets positively identified as HOSTILE
SAFE - In self-defense or in response to a formal order
Weapons Control Status
FREE - At targets not identified as FRIENDLY
TIGHT - At targets positively identified as HOSTILE
SAFE - In self-defense or in response to a formal order
